Google Cloud Vision analyzes images with machine learning models. The service is part of the Google Cloud AI platform and offers a REST API and client libraries for several programming languages.
The service can classify pictures, detect faces and landmarks, extract text, and return web matches. Pricing and quotas change over time, so check the current Cloud Vision pricing page before you build on it. As of May 2026, the API is free for the first 1000 units per month, and each feature counts as one unit. For example, if you enable label detection and face detection in the same request, that counts as two units.
In this example we look at how to write a simple web application that lets users upload images for analysis with Google Cloud Vision. The example is a small Angular client and Spring Boot back end.
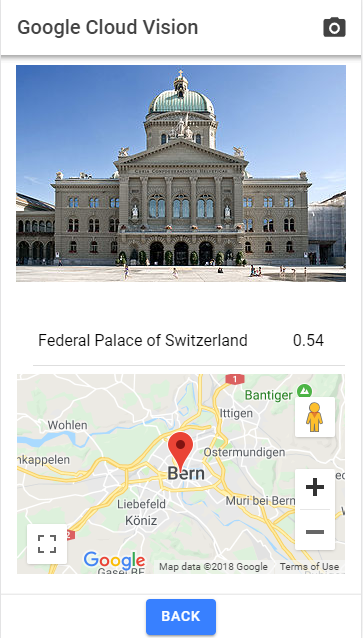
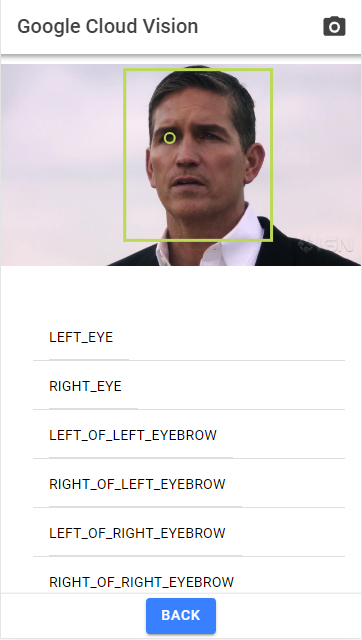
Here are two screenshots of the Angular client showing the Vision results. The first one shows landmark detection results, and the second one shows face detection results.
Upload via backend 
In this flow, the browser uploads the image file to the application server, which then sends the bytes to Google Cloud Vision for analysis.
Here an overview how this flow works:
Server 
To use Google Cloud Vision, you need a Google Cloud project with the Vision API enabled and a service account key that can call Vision. Additionally billing needs to be enabled on the project, but if you only send a few requests to the API you should be able to stay within the free tier.
First we need to add the Vision client library to the Spring Boot application:
    <dependency>
      <groupId>com.google.cloud</groupId>
      <artifactId>google-cloud-vision</artifactId>
      <version>3.90.0</version>
    </dependency>
I downloaded the service account key as a JSON file and stored it on my local machine. The path to the key file is stored in the Spring Boot application configuration:
app:
  credentials-path: C:\\w\\ws\\ext\\vision\\spiritual-craft-792-8b0436b690af.json
@ConfigurationProperties(prefix = "app")
@Component
public class AppConfig {
  private String credentialsPath;
The Spring Boot application loads the credentials path from the configuration properties into the service that calls Google Cloud Vision.
@Service
public class VisionService {

  private final AppConfig appConfig;

  public VisionService(AppConfig appConfig) {
    this.appConfig = appConfig;
  }
The program then creates a Vision request object that contains the image.
  public VisionResult vision(String base64data) throws IOException, Exception {
    com.google.cloud.vision.v1.Image image = com.google.cloud.vision.v1.Image
        .newBuilder()
        .setContent(ByteString.copyFrom(Base64.getDecoder().decode(base64data)))
        .build();
    return annotate(image);
  }
In the service the Vision client is initialized with the credentials loaded from the file path in the configuration.
  private VisionResult annotate(com.google.cloud.vision.v1.Image image)
      throws IOException, Exception {
    ServiceAccountCredentials credentials = ServiceAccountCredentials.fromStream(
        Files.newInputStream(Paths.get(this.appConfig.getCredentialsPath())));
    ImageAnnotatorSettings settings = ImageAnnotatorSettings.newBuilder()
        .setCredentialsProvider(FixedCredentialsProvider.create(credentials))
        .build();
    try (ImageAnnotatorClient vision = ImageAnnotatorClient.create(settings)) {
After that the service sends the request to Google Cloud Vision for analysis and returns the annotations to the controller.
      List<AnnotateImageRequest> requests = new ArrayList<>();
      AnnotateImageRequest request = AnnotateImageRequest.newBuilder()
          .addFeatures(
              Feature.newBuilder().setType(Feature.Type.FACE_DETECTION)
                  .build())
          .addFeatures(
              Feature.newBuilder().setType(Feature.Type.LANDMARK_DETECTION)
                  .build())
          .addFeatures(
              Feature.newBuilder().setType(Feature.Type.LOGO_DETECTION)
                  .build())
          .addFeatures(Feature.newBuilder()
              .setType(Feature.Type.LABEL_DETECTION).setMaxResults(20)
              .build())
          .addFeatures(
              Feature.newBuilder().setType(Feature.Type.TEXT_DETECTION)
                  .build())
          .addFeatures(Feature.newBuilder()
              .setType(Feature.Type.SAFE_SEARCH_DETECTION).build())
          .addFeatures(Feature.newBuilder().setType(Feature.Type.WEB_DETECTION)
              .setMaxResults(10).build())
          .setImage(image).build();
      requests.add(request);

      // Performs label detection on the image file
      BatchAnnotateImagesResponse response = vision.batchAnnotateImages(requests);
      List<AnnotateImageResponse> responses = response.getResponsesList();
      VisionResult result = new VisionResult();
      if (!responses.isEmpty()) {
Client 
On the client side we don't need any special libraries to upload the file. A regular file input accepts images.
            <input
              type="file"
              accept="image/*"
              (change)="onFileSelected($event, 'backend')"
              [disabled]="isBusy()"
            />
When the user selects a file, the Angular application reads the file as a data URL, which is a base64-encoded string.
  private readFileAsDataUrl(file: File): Promise<string> {
    return new Promise((resolve, reject) => {
      const reader = new FileReader();
      reader.onerror = () => reject(new Error('File failed to load'));
      reader.onload = () => resolve(String(reader.result));
      reader.readAsDataURL(file);
    });
  }
The Angular application then sends the data URL to the Spring Boot server in a JSON payload.
  uploadImage(file: File, dataUrl: string): Observable<VisionImage> {
    return this.http
      .post<ApiResult<VisionImage>>(this.imagesUrl, {
        name: file.name,
        type: file.type,
        size: file.size,
        data: dataUrl,
      })
      .pipe(
        map((response) => {
          const image = response.records[0];

          if (!image) {
            throw new Error('Upload response did not include an image record.');
          }

          return image;
        }),
      );
  }
While this approach is straightforward and easy to understand, it has a tradeoff. The image bytes are uploaded as base64-encoded data from the client to the Spring Boot server, and then from the server to Google Cloud Vision. For larger files or higher traffic, this results in a lot of data moving through the application server. In addition the base64 encoding adds about 33% overhead to the file size.
To solve these issues we can use a different upload flow that keeps the image bytes away from the application server.
Upload to Cloud Storage with a pre-signed URL 
In this flow, the application server never receives the image bytes. Instead, the browser uploads the file directly to Cloud Storage with a pre-signed URL, and then tells the server which object was uploaded so the Spring Boot application only needs to send a reference to the file in Cloud Storage to Google Cloud Vision for analysis.
The flow looks like this:
A pre-signed URL is a URL that Cloud Storage generates with a signature that allows anyone holding the URL to perform a specific operation (like PUT) on a specific object for a limited time. This way the browser can upload the file directly to Cloud Storage without requiring the client to have Cloud Storage credentials.
Server 
For this flow you need the same Google Cloud project and service account as before, but you also need to enable the Cloud Storage API and create a bucket to hold the uploaded files. The Spring Boot application needs the bucket name in the configuration.
@ConfigurationProperties(prefix = "app")
@Component
public class AppConfig {
  private String credentialsPath;

  private String storageBucket;
In addition to the Vision client library, the application also needs the Cloud Storage client library to generate pre-signed URLs.
    <dependency>
      <groupId>com.google.cloud</groupId>
      <artifactId>google-cloud-storage</artifactId>
      <version>2.68.0</version>
    </dependency>
When the client asks for the pre-signed URL the server generates a unique object name for the file to be uploaded, and creates a signed URL for that object with the PUT method. Everybody that has the generated URL can only send a single PUT request with the specified content type to the generated object name for 15 minutes.
  public SignedUploadTarget createSignedUploadTarget(String fileName,
      String contentType) throws IOException {
    String objectName = "uploads/" + UUID.randomUUID() + "-" + sanitizeFileName(fileName);
    BlobInfo blobInfo = BlobInfo.newBuilder(storageBucket(), objectName)
        .setContentType(StringUtils.hasText(contentType) ? contentType
            : "application/octet-stream")
        .build();

    URL signedUrl = storage().signUrl(blobInfo, 15, TimeUnit.MINUTES,
        SignUrlOption.httpMethod(HttpMethod.PUT),
        SignUrlOption.withV4Signature(),
        SignUrlOption.withExtHeaders(
            java.util.Map.of("Content-Type", blobInfo.getContentType())));

    return new SignedUploadTarget(signedUrl.toString(), objectName,
        blobInfo.getContentType());
  }
The difference to the previous flow is that the server doesn't receive the image bytes from the client, but instead only gets a reference to the file in Cloud Storage. The server can then send that reference to Google Cloud Vision for analysis.
  public VisionResult visionFromStorage(String objectName) throws IOException, Exception {
    com.google.cloud.vision.v1.Image image = com.google.cloud.vision.v1.Image
        .newBuilder().setSource(ImageSource.newBuilder().setGcsImageUri(
            "gs://" + storageBucket() + "/" + objectName))
        .build();
    return annotate(image);
  }
Client 
Selecting the image file works the same as in the previous flow, but instead of reading the file as a data URL, the Angular application first requests a pre-signed upload URL from the server. The server responds with the pre-signed URL and the object name that the client should use to upload the file to Cloud Storage.
The Angular application then uploads the file directly to Cloud Storage with a PUT request to the pre-signed URL. After the upload is complete, the client calls the server again to tell it which object was uploaded, so the server can send a reference to that object to Google Cloud Vision for analysis.
  uploadImageViaPresignedUrl(file: File): Observable<VisionImage> {
    return this.http
      .post<PresignedUploadTarget>(`${this.imagesUrl}/presigned-upload`, {
        name: file.name,
        type: file.type,
      })
      .pipe(
        switchMap((target) =>
          this.http
            .put(target.uploadUrl, file, {
              headers: new HttpHeaders({
                'Content-Type': target.contentType || file.type || 'application/octet-stream',
              }),
              responseType: 'text',
            })
            .pipe(map(() => target)),
        ),
        switchMap((target) =>
          this.http.post<ApiResult<VisionImage>>(`${this.imagesUrl}/storage`, {
            name: file.name,
            type: file.type,
            size: file.size,
            objectName: target.objectName,
          }),
        ),
        map((response) => {
          const image = response.records[0];

          if (!image) {
            throw new Error('Upload response did not include an image record.');
          }

          return image;
        }),
      );
  }
Displaying the results 
The Angular client renders the Vision annotations as overlays on top of the image, tables, and a map for landmarks. The client also shows a table with the label annotations and safe search results.
Here a few snippets of how the client renders the results. The first one shows how the client renders the bounding boxes for face detection. It uses a SVG overlay on top of the image to draw the bounding boxes for the detected faces.
      <div class="viewer-frame" [class.empty]="!displayImageUrl()">
        @if (displayImageUrl()) {
          <svg class="viewer-svg" preserveAspectRatio="xMinYMin meet" [attr.viewBox]="viewBox()">
            <image
              [attr.href]="displayImageUrl()"
              x="0"
              y="0"
              [attr.width]="imageSize().width"
              [attr.height]="imageSize().height"
              preserveAspectRatio="xMinYMin meet"
            />

            @if (selectedPolygonPoints()) {
              <polygon class="overlay-polygon" [attr.points]="selectedPolygonPoints()" />
            }

            @if (selectedPoint()) {
              <circle
                class="overlay-point"
                [attr.cx]="selectedPoint()!.x"
                [attr.cy]="selectedPoint()!.y"
                r="10"
              />
            }
          </svg>
        } @else {
          <div class="empty-state large">
            <p>Select an analyzed image to inspect its annotations.</p>
          </div>
        }
      </div>
The second snippet shows how the client renders the landmark annotations on a map:
        @if (selectedImage() && activeTab() === 'landmarks') {
          <div class="stacked-sections">
            <div class="table-card">
              <table>
                <thead>
                  <tr>
                    <th>Description</th>
                    <th>Score</th>
                  </tr>
                </thead>
                <tbody>
                  @for (landmark of selectedImage()!.landmarks ?? []; track $index) {
                    <tr
                      class="interactive-row"
                      (click)="highlightPolygon(landmark.boundingPoly, landmark.locations)"
                    >
                      <td>{{ landmark.description }}</td>
                      <td>{{ asPercent(landmark.score) }}</td>
                    </tr>
                  } @empty {
                    <tr>
                      <td colspan="2">No landmark detections.</td>
                    </tr>
                  }
                </tbody>
              </table>
            </div>

            <section class="map-card">
              <div class="map-copy">
                <h3>Map</h3>
                <p>
                  {{
                    selectedLocations().length > 0
                      ? 'The map centers on the selected landmark result.'
                      : 'Select a landmark with location metadata to center the map.'
                  }}
                </p>
              </div>
              <div class="map-frame" #mapContainer aria-label="Landmark map"></div>
            </section>
          </div>
        }
For the map the client uses the maplibre-gl library and for the tiles is uses the OpenStreetMap tile server. Read the terms of use before you use the OpenStreetMap tile server in your application, and consider setting up your own tile server if you expect a lot of traffic.
Wrapping up 
Google Cloud Vision is a useful service for analyzing images. It can classify pictures, detect faces and landmarks, extract text, and return web matches.
This post showed two ways to upload images for analysis with Google Cloud Vision: upload through the server and upload to Cloud Storage with a pre-signed URL. The first approach is simpler to implement but can lead to performance issues for larger files or higher traffic, while the second approach keeps the image bytes away from the application server and can scale better.