WebAuthn (Web Authentication) is the web standard for authenticating users with public/private key cryptography.
WebAuthn works with public/private key pairs. The authenticator generates a key pair for a relying party, stores the private key securely, and sends the public key to the server. During sign-in, the server creates a random challenge and sends it to the browser. The authenticator signs that challenge with the private key, and the server verifies the signature with the stored public key.
In current browsers and operating systems, this usually shows up as a passkey experience. The authenticator can be a platform authenticator such as Windows Hello, Touch ID, Face ID, or the device credential on Android and iOS, or it can be a roaming security key connected over USB, NFC, or Bluetooth.
WebAuthn is widely available in current desktop and mobile browsers. In production it requires HTTPS; for local development, localhost is allowed.
In this blog post, I show how to integrate WebAuthn into an Angular front end styled with daisyUI and a Spring Boot back end. The demo uses discoverable credentials, so the user can sign in without typing a username or password.
This article focuses on the application architecture and the code paths in the demo. If you want to go deeper into the standard itself, these resources are worth bookmarking.
- https://fidoalliance.org/fido2/
- https://webauthn.io/
- https://webauthn.guide/
- https://github.com/herrjemand/awesome-webauthn
Auth0 also hosts an excellent visual demo that shows the data flowing between browser, authenticator, and server.
The Yubico documentation for WebAuthn and the Java server library used in this demo is also very helpful.
WebAuthn API 
The Web Authentication API extends the Credential Management API. The two core entry points are navigator.credentials.create() for registration and navigator.credentials.get() for authentication.
Current browsers also provide convenient JSON helpers on PublicKeyCredential, including parseCreationOptionsFromJSON(), parseRequestOptionsFromJSON(), and toJSON(). The demo uses these helpers so the client can exchange plain JSON with the server.
An easy way to check whether a browser supports WebAuthn is to look for the PublicKeyCredential interface.
if (window.PublicKeyCredential) {
  // WebAuthn supported
}
Demo application 
For this blog post, I wrote an Angular TypeScript web application and a Spring Boot back end.
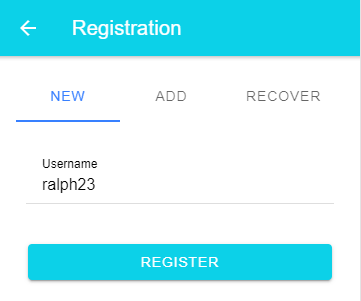
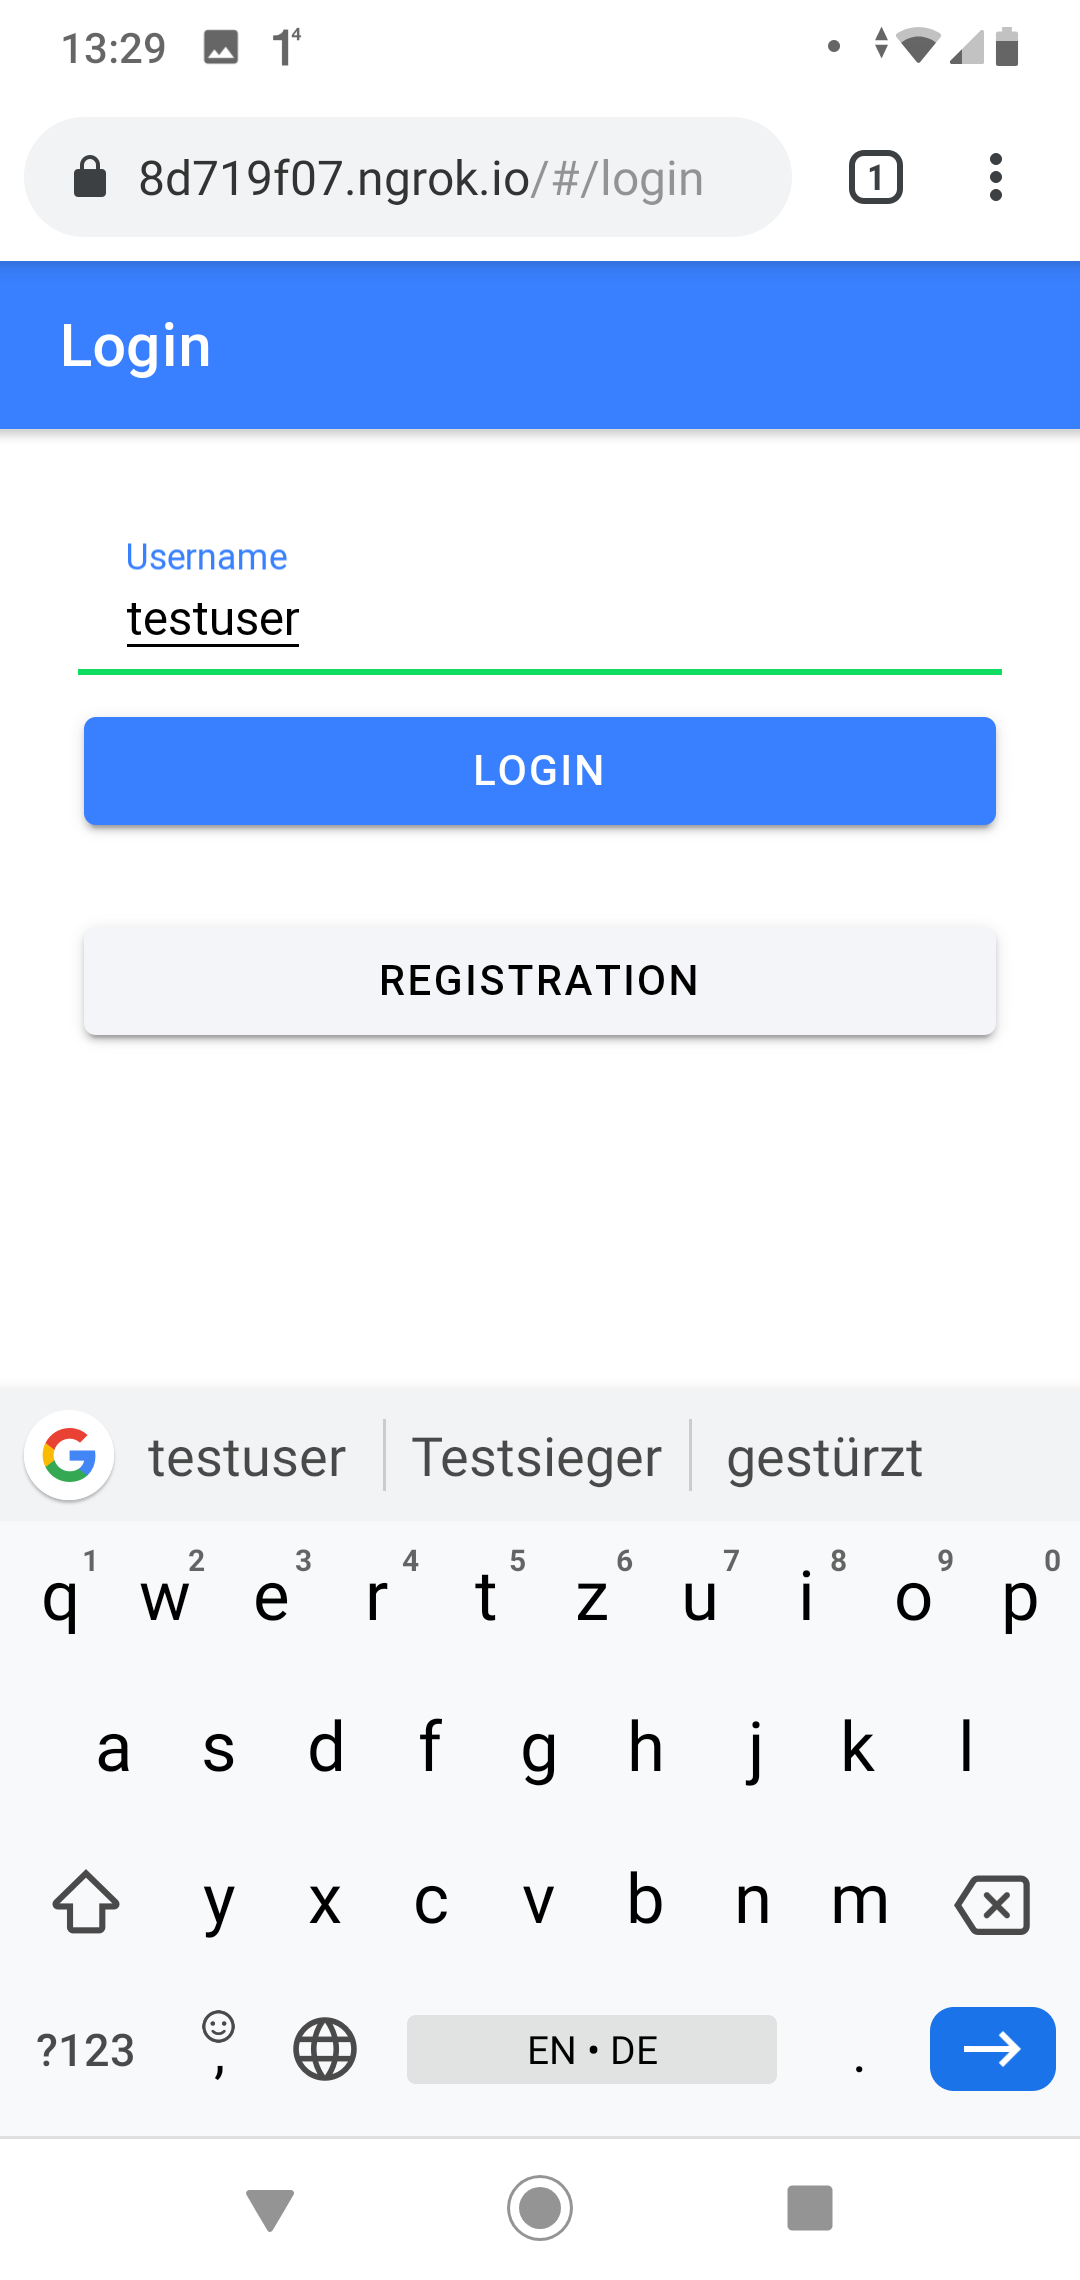
The application has a registration page and a sign-in page. A new registration only asks for a username, and there is also a recovery flow based on a recovery code.
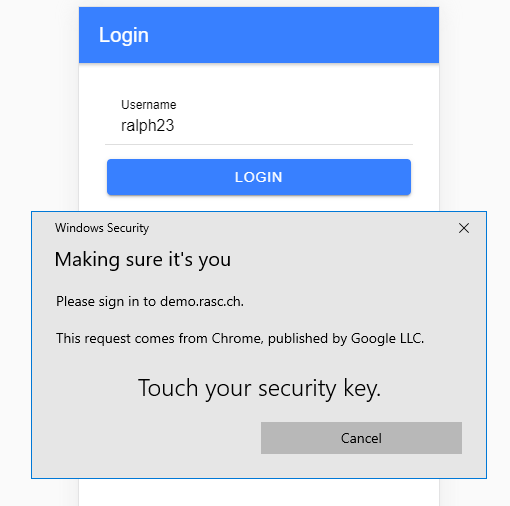
For sign-in, the user taps the passkey button and the browser or operating system presents the available discoverable credentials for the current relying party.

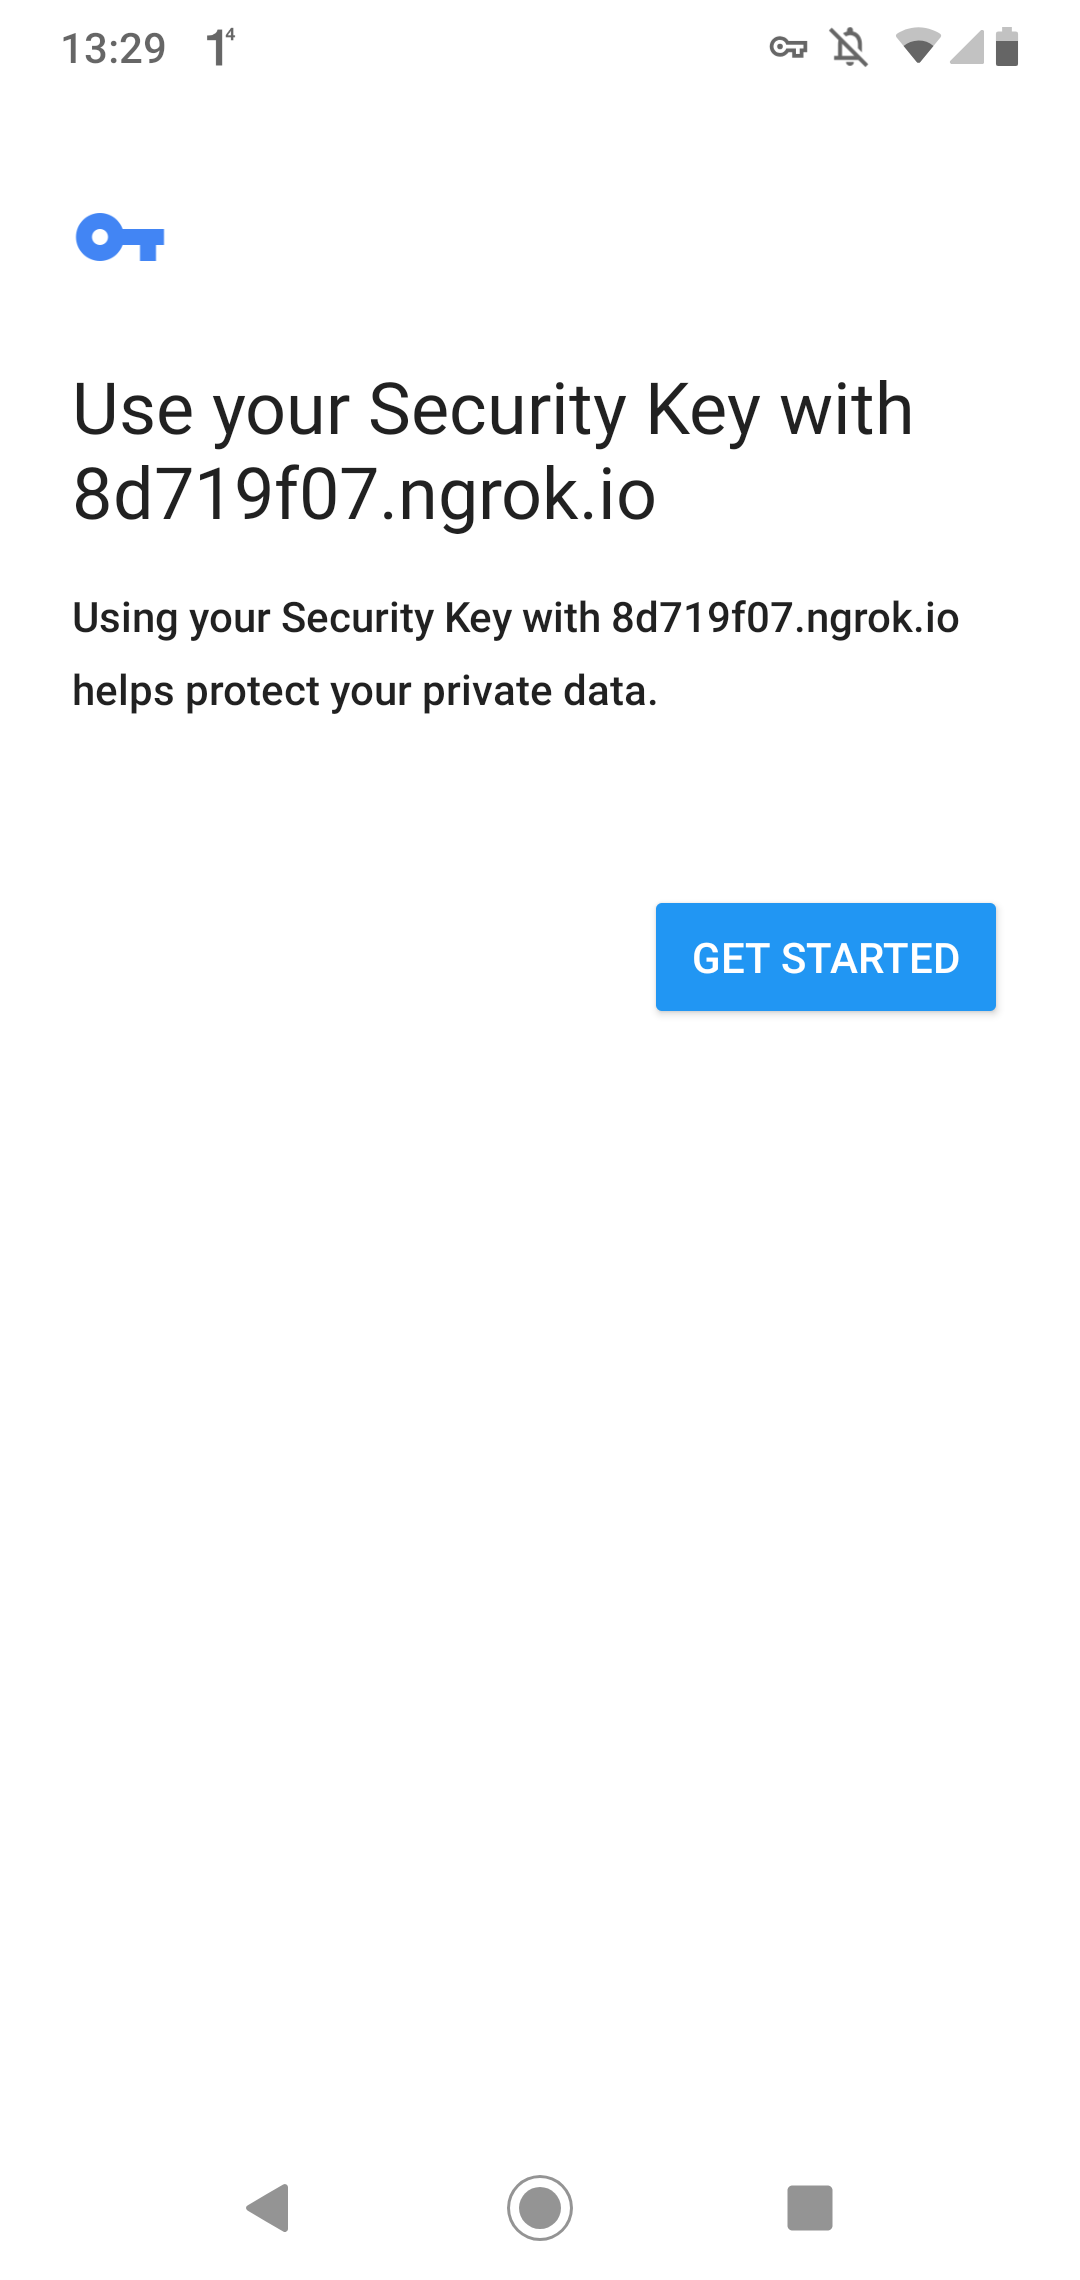
On Android, the user experience looks a bit different, but the flow is the same.
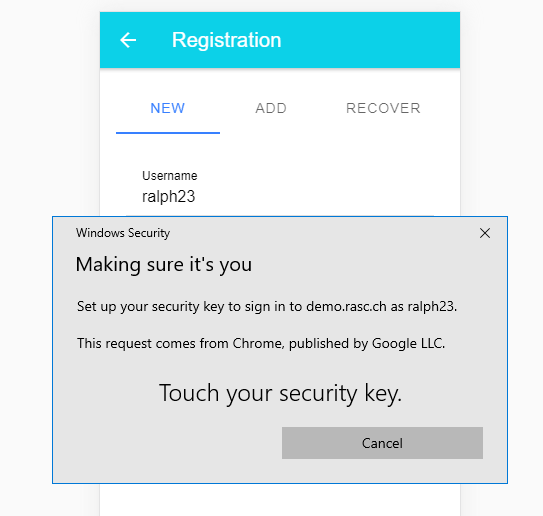
Registration
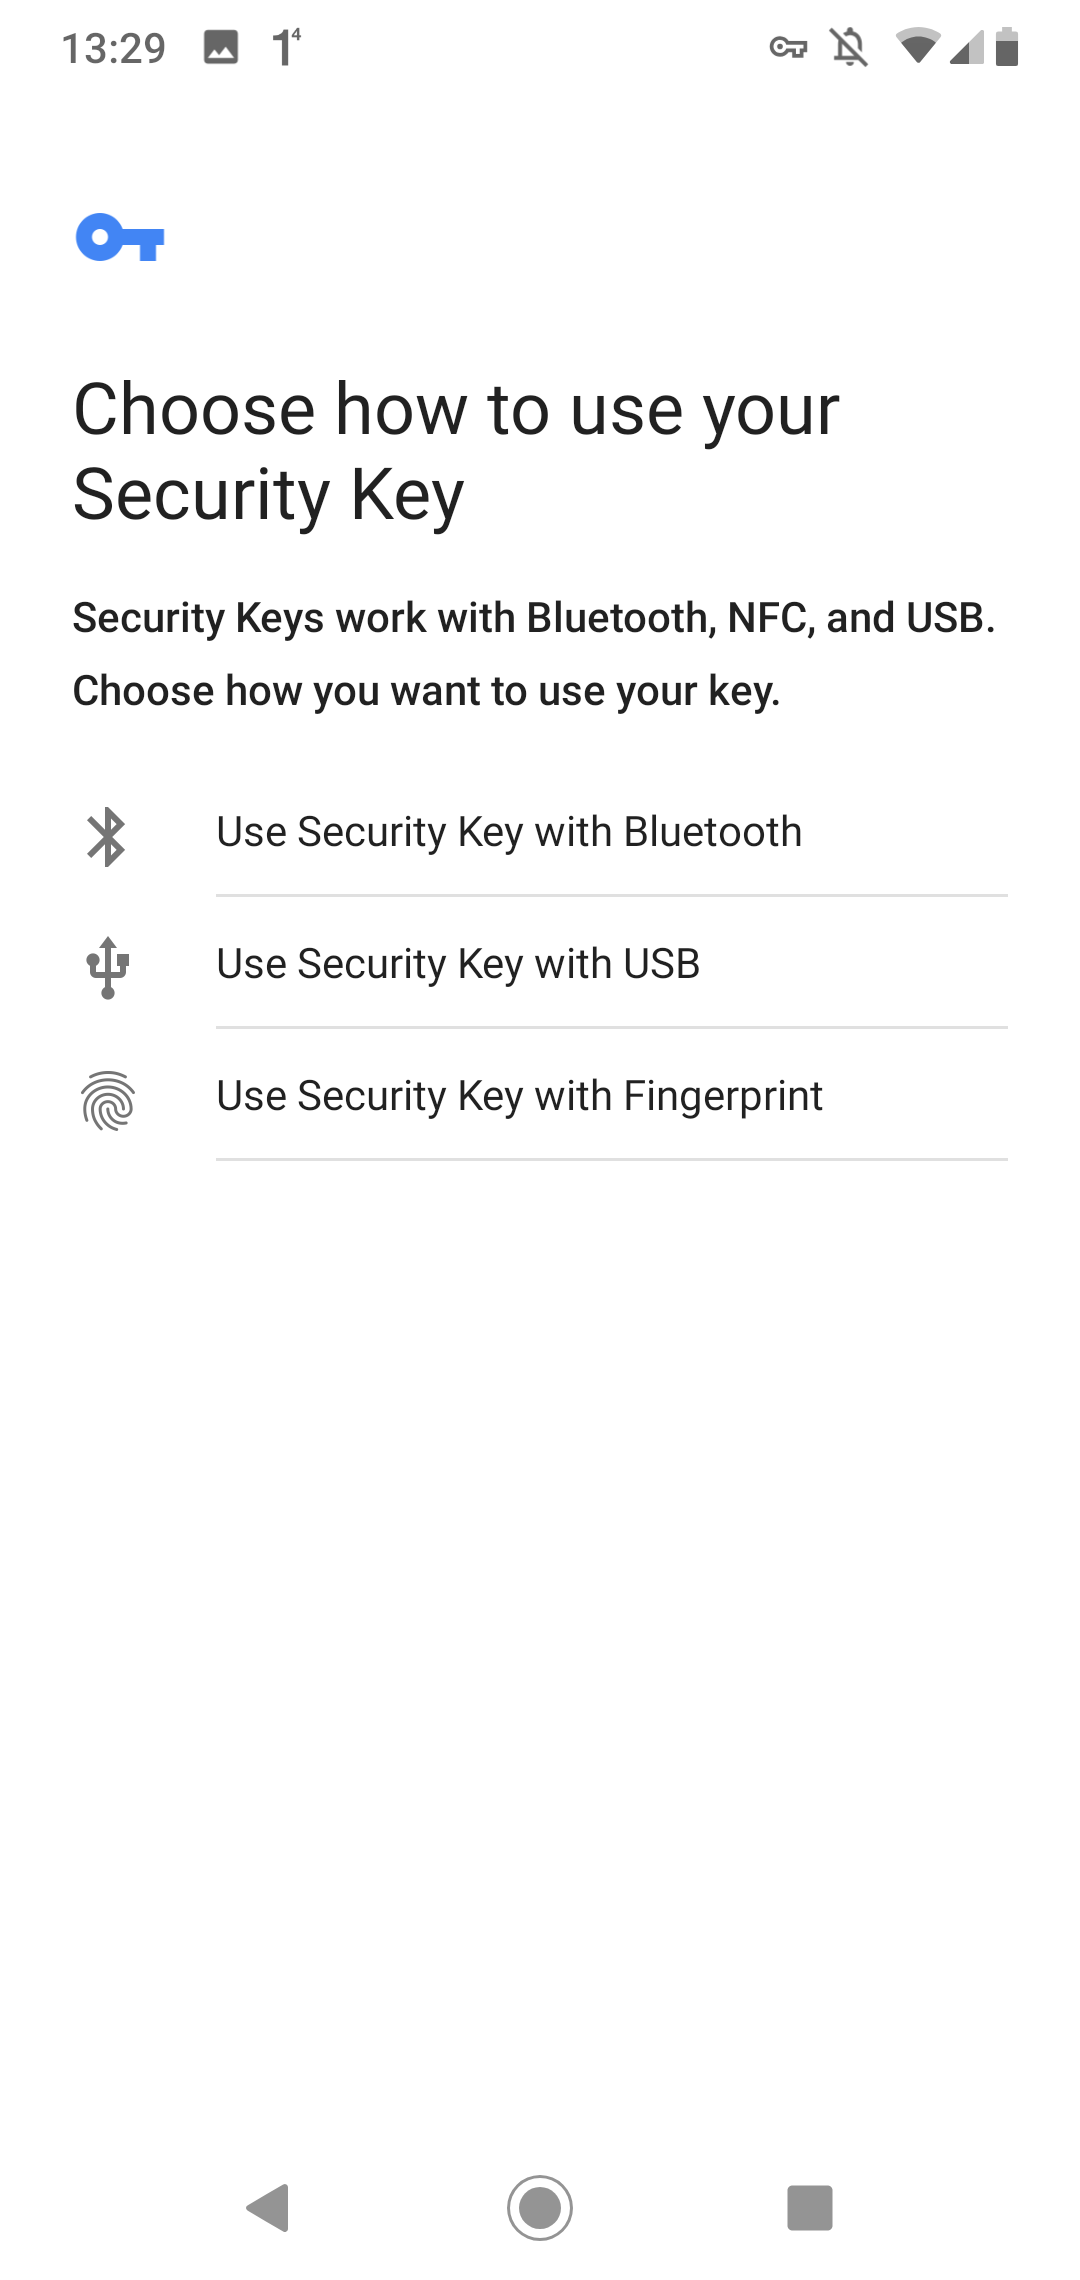
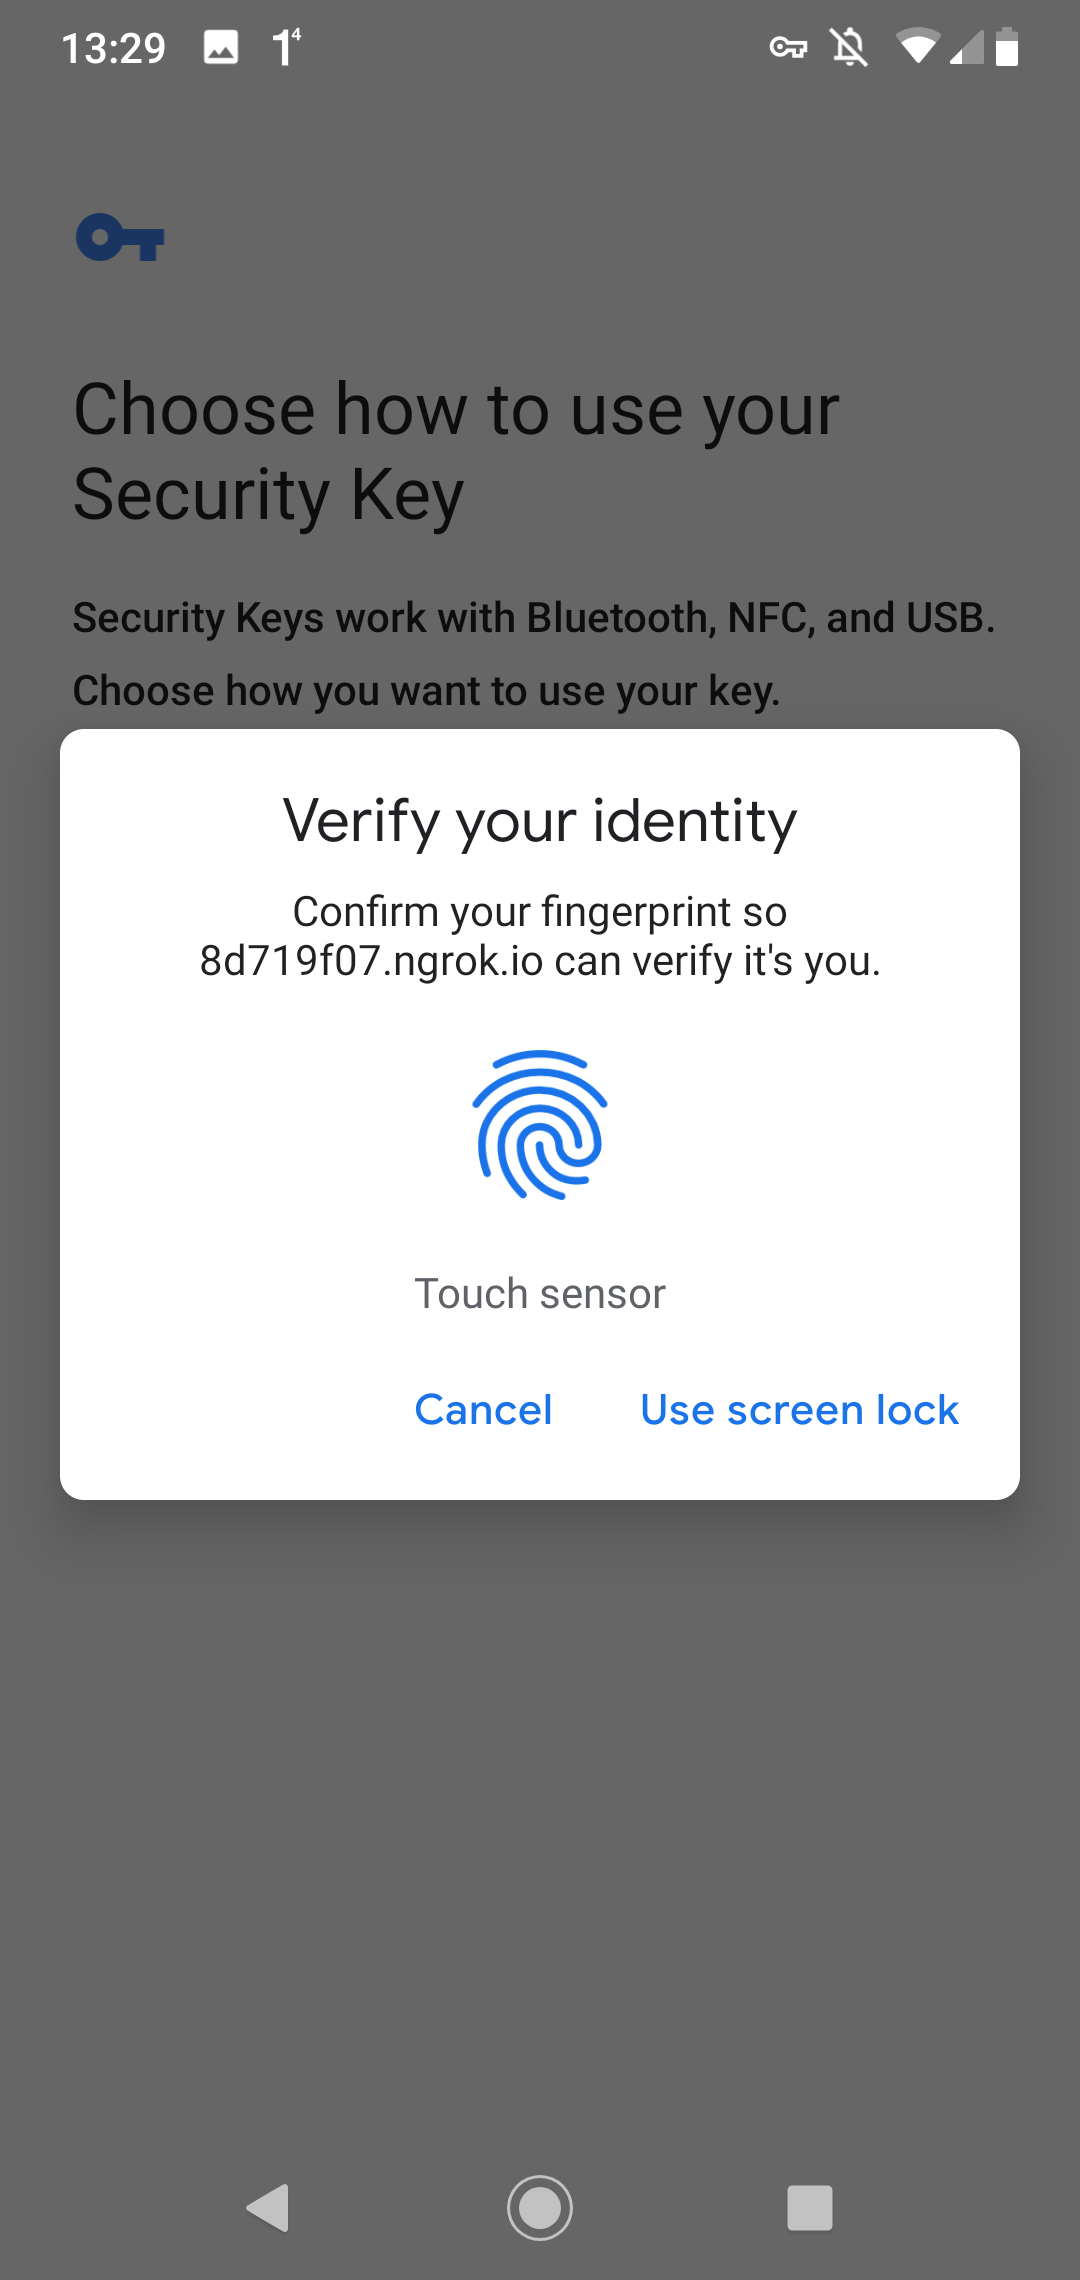
Login
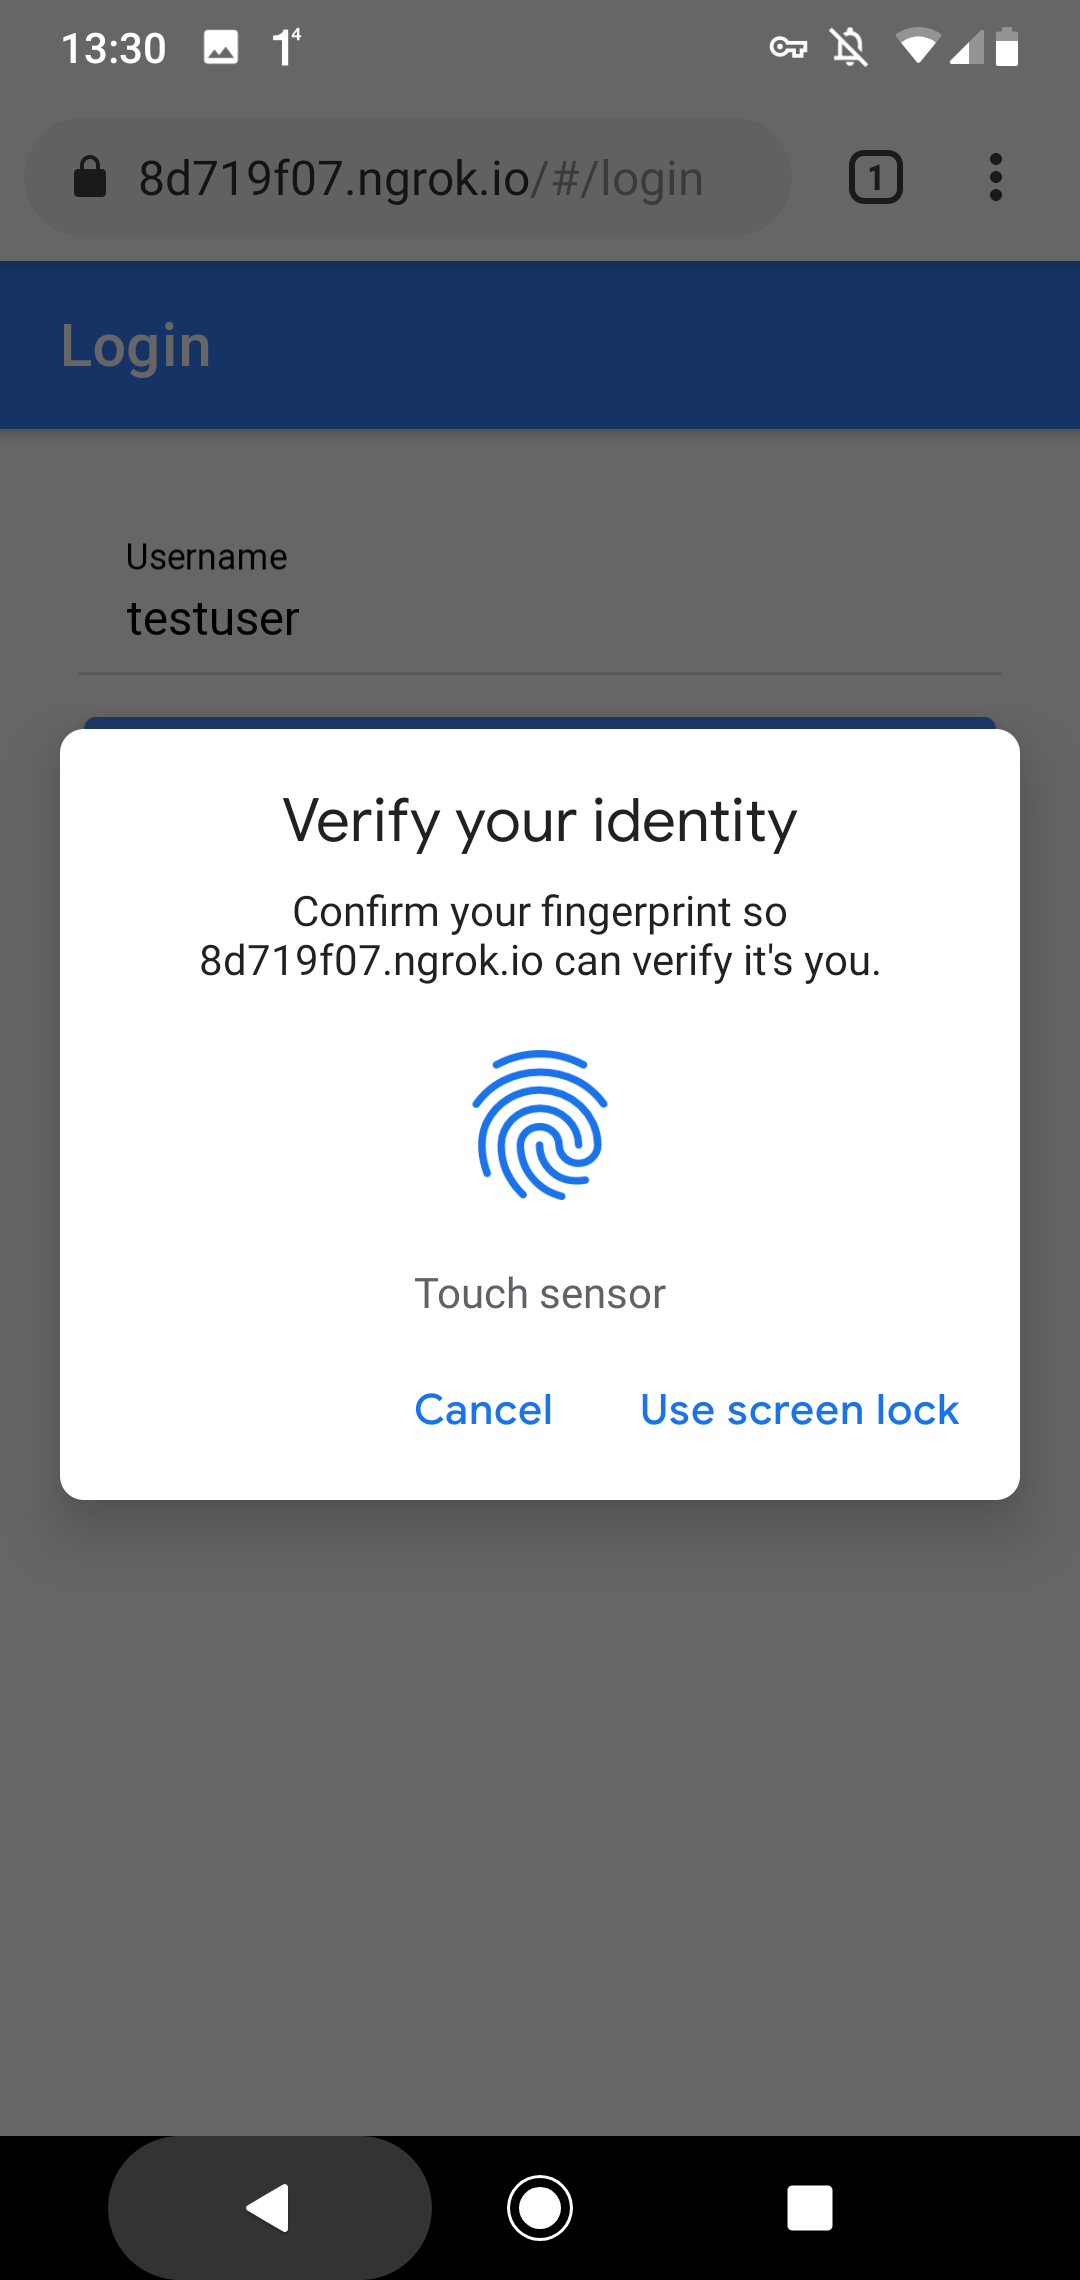
WebAuthn is not the same thing as biometric authentication. User verification may use a fingerprint, face recognition, a PIN, or the device credential, depending on the platform and the authenticator.
Source Code 
The source code for the demo application is stored in this GitHub repository: https://github.com/ralscha/webauthn-demo
The Spring Boot application lives in the server folder. For local development, first start PostgreSQL with docker compose up, then start the application from your IDE or with mvnw spring-boot:run. The server listens on port 8080.
The web application is in the client folder. Run npm install once, then start it with npm start. The application is served from port 4200.
Because the two applications run on different origins during development, the client uses an Angular dev proxy instead of enabling CORS on the server. The proxy is enabled through the proxyConfig option in angular.json.
        "serve": {
          "builder": "@angular/build:dev-server",
          "options": {
            "proxyConfig": "proxy.conf.json",
            "buildTarget": "app:build"
          },
Libraries 
On the server, I use the Yubico java-webauthn-server library to create WebAuthn options and validate registration and assertion responses.
    <dependency>
      <groupId>com.yubico</groupId>
      <artifactId>webauthn-server-core</artifactId>
      <version>2.9.0</version>
    </dependency>
    <dependency>
      <groupId>com.yubico</groupId>
      <artifactId>yubico-util</artifactId>
      <version>2.9.0</version>
    </dependency>
On the client, the application uses the browser-native WebAuthn APIs directly. No additional WebAuthn library is required.
Implementation details 
The Yubico library requires an implementation of the CredentialRepository interface.
You find my implementation here: JooqCredentialRepository.java
The library uses this implementation to read existing credentials and to verify assertions.
The library also needs a RelyingParty instance. The demo application creates it as a Spring bean.
The two important properties are RelyingPartyIdentity.id and RelyingParty.origins.
The id must be the effective domain of your application, for example localhost or example.com, without scheme or port. The browser validates this value during both navigator.credentials.create() and navigator.credentials.get().
The origins property contains the full allowed origins, for example http://localhost:4200 or https://app.example.com. The server validates the origin against this collection.
  @Bean
  public RelyingParty relyingParty(JooqCredentialRepository credentialRepository,
      AppProperties appProperties) {

    RelyingPartyIdentity rpIdentity = RelyingPartyIdentity.builder()
        .id(appProperties.getRelyingPartyId()).name(appProperties.getRelyingPartyName())
        .build();

    return RelyingParty.builder().identity(rpIdentity)
        .credentialRepository(credentialRepository)
        .origins(appProperties.getRelyingPartyOrigins()).build();
  }
I externalized these settings with a @ConfigurationProperties annotated POJO, AppProperties.java, so they can be changed in application.properties or from the command line.
For local testing on localhost, I use these values.
app.relying-party-id=localhost
app.relying-party-name=Example Application
app.relying-party-origins=http://localhost:4200
The demo creates discoverable credentials by setting residentKey to REQUIRED and userVerification to PREFERRED during registration.
      PublicKeyCredentialCreationOptions credentialCreation = this.relyingParty
          .startRegistration(StartRegistrationOptions.builder()
              .user(UserIdentity.builder().name(name).displayName(name).id(webAuthnId)
                  .build())
              .authenticatorSelection(AuthenticatorSelectionCriteria.builder()
                  .residentKey(ResidentKeyRequirement.REQUIRED)
                  .userVerification(UserVerificationRequirement.PREFERRED).build())
              .build());
Entities 
The application stores users and credentials in a relational database.
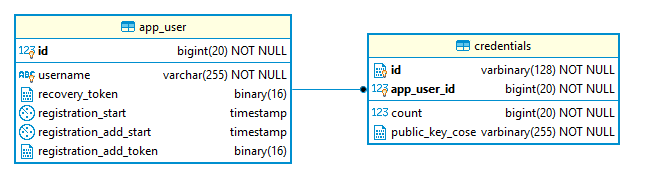
For WebAuthn itself, the essential user fields are app_user.id and app_user.username. Each user can own multiple credentials, so there is a one-to-many relationship between app_user and credentials.
In the credentials table, the application stores the credential ID, the WebAuthn user handle, the public key, the optional transports, and the signature counter used to detect replay attacks.
The application uses jOOQ and Flyway for database access and schema management. If you are interested in that setup, check out my blog post about jOOQ, Flyway, and Spring Boot.
Registration 
Overview of the registration process.
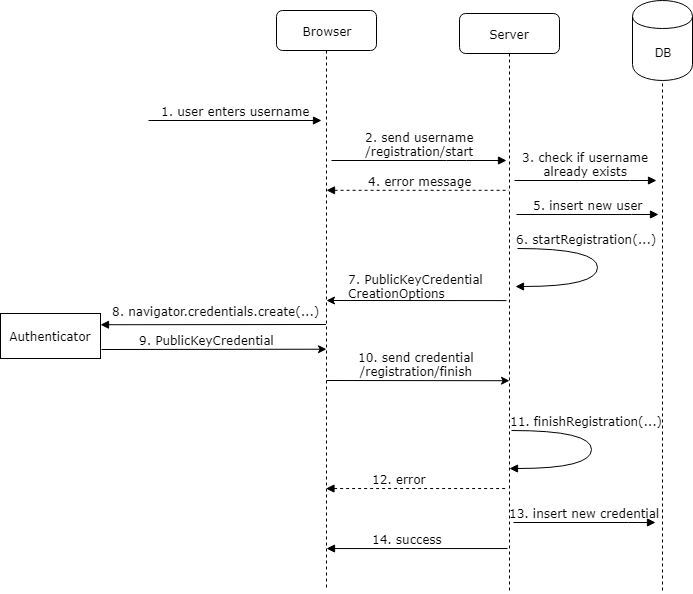
Registration requires two round trips from the client to the server.
First, the client sends a POST request to /registration/start. The endpoint supports two modes: a new registration based on a username, and a recovery-based registration based on a recovery token.
  @PostMapping("/registration/start")
  public RegistrationStartResponse registrationStart(
      @RequestParam(name = "username", required = false) String username,
      @RequestParam(name = "recoveryToken", required = false) String recoveryToken) {

    long userId = -1;
    String name = null;
    Mode mode = null;

    if (username != null && !username.isEmpty()) {
      // cancel if the user is already registered
      int count = this.dsl.selectCount().from(APP_USER)
          .where(APP_USER.USERNAME.equalIgnoreCase(username)).fetchOne(0, int.class);
      if (count > 0) {
        return new RegistrationStartResponse(
            RegistrationStartResponse.Status.USERNAME_TAKEN);
      }

      var insertedUser = this.dsl
          .insertInto(APP_USER, APP_USER.USERNAME, APP_USER.REGISTRATION_START)
          .values(username, LocalDateTime.now(this.clock)).returning(APP_USER.ID)
          .fetchOne();
      if (insertedUser == null) {
        throw new IllegalStateException("Failed to create user");
      }

      userId = insertedUser.getId();
      name = username;
      mode = Mode.NEW;
    }
    else if (recoveryToken != null && !recoveryToken.isEmpty()) {
      byte[] recoveryTokenDecoded;
      try {
        recoveryTokenDecoded = Base58.decode(recoveryToken);
      }
      catch (Exception e) {
        return new RegistrationStartResponse(
            RegistrationStartResponse.Status.TOKEN_INVALID);
      }

      var record = this.dsl.select(APP_USER.ID, APP_USER.USERNAME).from(APP_USER)
          .where(APP_USER.RECOVERY_TOKEN.eq(recoveryTokenDecoded)).fetchOne();

      if (record == null) {
        return new RegistrationStartResponse(
            RegistrationStartResponse.Status.TOKEN_INVALID);
      }

      userId = record.get(APP_USER.ID);
      name = record.get(APP_USER.USERNAME);
      mode = Mode.RECOVERY;
    }
For a new account, the server checks whether the username is already taken and inserts a new user row. For recovery, the server resolves the recovery token to an existing user and deletes the old credentials before starting a fresh registration.
Next, the handler calls startRegistration() on the RelyingParty bean. It builds a UserIdentity and gets back a PublicKeyCredentialCreationOptions instance with a fresh random challenge.
    if (mode != null) {
      byte[] webAuthnIdBytes = new byte[64];
      this.random.nextBytes(webAuthnIdBytes);
      ByteArray webAuthnId = new ByteArray(webAuthnIdBytes);

      PublicKeyCredentialCreationOptions credentialCreation = this.relyingParty
          .startRegistration(StartRegistrationOptions.builder()
              .user(UserIdentity.builder().name(name).displayName(name).id(webAuthnId)
                  .build())
              .authenticatorSelection(AuthenticatorSelectionCriteria.builder()
                  .residentKey(ResidentKeyRequirement.REQUIRED)
                  .userVerification(UserVerificationRequirement.PREFERRED).build())
              .build());

      byte[] registrationId = new byte[16];
      this.random.nextBytes(registrationId);
      RegistrationStartResponse startResponse = new RegistrationStartResponse(mode,
          Base64.getEncoder().encodeToString(registrationId), credentialCreation);

      this.registrationCache.put(startResponse.getRegistrationId(), startResponse);
      this.registrationUserIdCache.put(startResponse.getRegistrationId(), userId);

      return startResponse;
    }
The demo stores the PublicKeyCredentialCreationOptions in a Caffeine in-memory cache because the server needs the same object again when it validates the second request.
    this.registrationCache = Caffeine.newBuilder().maximumSize(1000)
        .expireAfterAccess(5, TimeUnit.MINUTES).build();
    this.registrationUserIdCache = Caffeine.newBuilder().maximumSize(1000)
        .expireAfterAccess(5, TimeUnit.MINUTES).build();
    this.assertionCache = Caffeine.newBuilder().maximumSize(1000)
        .expireAfterAccess(5, TimeUnit.MINUTES).build();
That approach is fine for a single-instance demo. In a multi-instance deployment you would store this state in a shared store such as a database or a clustered cache.
The client receives a JSON response, reconstructs the PublicKeyCredentialCreationOptions with PublicKeyCredential.parseCreationOptionsFromJSON(), calls navigator.credentials.create(), and serializes the returned PublicKeyCredential back to JSON with toJSON().
  private async createCredentials(response: SuccessfulRegistrationStartResponse): Promise<void> {
    let credential: PublicKeyCredentialJSON;
    try {
      const publicKey = PublicKeyCredential.parseCreationOptionsFromJSON(
        response.publicKeyCredentialCreationOptions,
      );
      const cred = (await navigator.credentials.create({
        publicKey,
      })) as PublicKeyCredential | null;
      if (!cred) {
        return;
      }
      credential = cred.toJSON();
    } catch (error) {
      if (!this.isExpectedCredentialError(error)) {
        await this.messagesService.showErrorToast('Registration failed');
      }
      return;
    }

    const credentialResponse = {
      registrationId: response.registrationId,
      credential,
    };

    const loading = await this.messagesService.showLoading('Finishing registration ...');

    try {
      const recoveryToken = await firstValueFrom(
        this.httpClient.post('registration/finish', credentialResponse, { responseType: 'text' }),
      );

      if (recoveryToken) {
        this.recoveryToken.set(recoveryToken);
      } else {
        await this.messagesService.showErrorToast('Registration failed');
      }
    } catch {
      await this.messagesService.showErrorToast('Registration failed');
    } finally {
      await loading.dismiss();
    }
  }
The browser talks to the authenticator and returns an AuthenticatorAttestationResponse that contains the attestation data and the newly created public key material.
The application sends that JSON payload to /registration/finish.
On the server, the finish endpoint loads the cached request, calls finishRegistration(), stores the validated credential, and returns the recovery token to the client.
  @PostMapping("/registration/finish")
  public String registrationFinish(@RequestBody RegistrationFinishRequest finishRequest) {

    RegistrationStartResponse startResponse = this.registrationCache
        .getIfPresent(finishRequest.getRegistrationId());
    this.registrationCache.invalidate(finishRequest.getRegistrationId());
    Long userId = this.registrationUserIdCache
        .getIfPresent(finishRequest.getRegistrationId());
    this.registrationUserIdCache.invalidate(finishRequest.getRegistrationId());

    if (startResponse != null) {
      try {
        RegistrationResult registrationResult = this.relyingParty
            .finishRegistration(FinishRegistrationOptions.builder()
                .request(startResponse.getPublicKeyCredentialCreationOptions())
                .response(finishRequest.getCredential()).build());

        UserIdentity userIdentity = startResponse.getPublicKeyCredentialCreationOptions()
            .getUser();

        String transports = null;
        Optional<SortedSet<AuthenticatorTransport>> transportOptional = registrationResult
            .getKeyId().getTransports();
        if (transportOptional.isPresent()) {
          transports = "";
          for (AuthenticatorTransport at : transportOptional.get()) {
            if (transports.length() > 0) {
              transports += ",";
            }
            transports += at.getId();
          }
        }
        if (startResponse.getMode() == Mode.RECOVERY) {
          this.dsl.deleteFrom(CREDENTIALS).where(CREDENTIALS.APP_USER_ID.eq(userId))
              .execute();
        }

        this.credentialRepository.addCredential(userId, userIdentity.getId().getBytes(),
            registrationResult.getKeyId().getId().getBytes(),
            registrationResult.getPublicKeyCose().getBytes(), transports,
            finishRequest.getCredential().getResponse().getParsedAuthenticatorData()
                .getSignatureCounter());

        if (startResponse.getMode() == Mode.NEW
            || startResponse.getMode() == Mode.RECOVERY) {
          byte[] recoveryToken = new byte[16];
          this.random.nextBytes(recoveryToken);

          this.dsl.update(APP_USER).set(APP_USER.REGISTRATION_START, (LocalDateTime) null)
              .set(APP_USER.RECOVERY_TOKEN, recoveryToken).where(APP_USER.ID.eq(userId))
              .execute();

          return Base58.encode(recoveryToken);
        }

        return "OK";
      }
      catch (RegistrationFailedException e) {
        Application.log.error("registration failed", e);
      }
    }
    else {
      Application.log.error("invalid registration finish request");
    }

    return null;
  }
If validation fails, the Yubico library throws a RegistrationFailedException.
There is one practical issue to handle here.
The server inserts the user during the first request so it has a stable database identity for the registration flow. But a successful start request does not guarantee that the client will finish the second round trip. The browser might be closed, the user might cancel, or the network might fail.
To keep unfinished registrations from accumulating, the application stores the timestamp of the pending registration in app_user.registration_start. When /registration/finish succeeds, it clears that column. A scheduled cleanup job removes stale rows older than 10 minutes.
  @Scheduled(cron = "0 0 * * * *")
  public void doCleanup() {
    // Delete all users with a pending registration older than 10 minutes
    this.dsl.delete(APP_USER)
        .where(APP_USER.REGISTRATION_START
            .le(LocalDateTime.now(this.clock).minusMinutes(10)))
        .execute();
  }
Sign-In 
The sign-in flow looks very similar to registration.
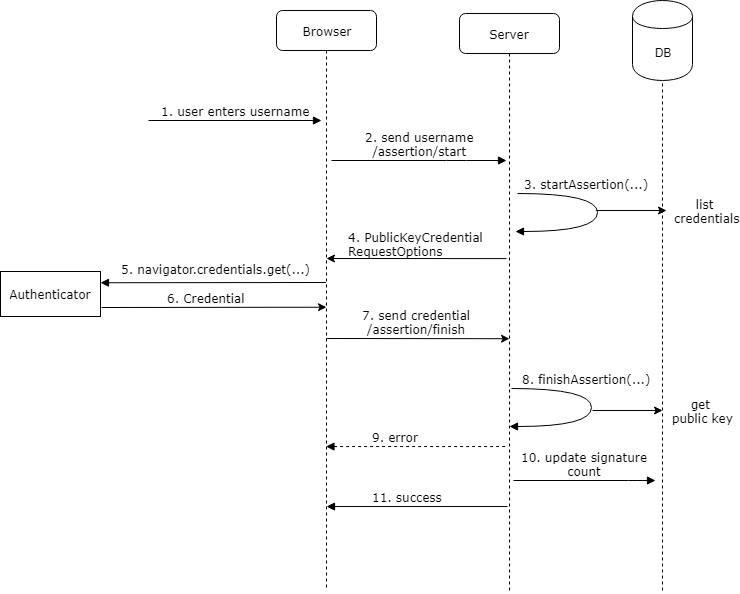
This demo uses discoverable credentials, so the assertion flow itself does not require a username. To showcase passkey autofill, the login page includes a username field with autocomplete="username webauthn" and also keeps a dedicated passkey button as a fallback.
      <label class="form-control w-full gap-2">
        <span class="label-text">Username</span>
        <input
          autocomplete="username webauthn"
          class="input w-full"
          name="username"
          placeholder="Tap here to show passkeys in autofill"
          type="text"
        />
      </label>

      <button (click)="signIn()" class="btn btn-primary btn-block" type="button">
        Sign in with passkey
      </button>

      @if (conditionalMediationAvailable()) {
        <p class="text-center text-sm text-base-content/70">
          Click in the username field to trigger passkey autofill.
        </p>
      }
The application first sends a POST request to /assertion/start. The server calls startAssertion() to create an AssertionRequest, which internally contains a PublicKeyCredentialRequestOptions instance and a new random challenge.
  @PostMapping("/assertion/start")
  public AssertionStartResponse start() {
    byte[] assertionId = new byte[16];
    this.random.nextBytes(assertionId);

    String assertionIdBase64 = Base64.getEncoder().encodeToString(assertionId);
    StartAssertionOptionsBuilder userVerificationBuilder = StartAssertionOptions.builder()
        .userVerification(UserVerificationRequirement.PREFERRED);
    AssertionRequest assertionRequest = this.relyingParty
        .startAssertion(userVerificationBuilder.build());

    AssertionStartResponse response = new AssertionStartResponse(assertionIdBase64,
        assertionRequest);

    this.assertionCache.put(response.getAssertionId(), response);
    return response;
  }
Like in the registration flow, the server caches this object because it has to pass the same request into finishAssertion().
The client reconstructs the request object with PublicKeyCredential.parseRequestOptionsFromJSON(), calls navigator.credentials.get(), converts the returned credential to JSON with toJSON(), and posts it to /assertion/finish. The login page does this in two modes: an explicit button-triggered sign-in and a conditional-mediation autofill flow started when the page loads.
  async signIn(): Promise<void> {
    this.abortConditionalMediation();

    const loading = await this.messagesService.showLoading('Initiate login ...');
    try {
      const response = await firstValueFrom(
        this.httpClient.post<AssertionStartResponse>('assertion/start', null),
      );
      await loading.dismiss();
      await this.handleAssertionStart(response);
    } catch {
      await loading.dismiss();
      await this.messagesService.showErrorToast('Login failed');
    }
  }

  private async handleAssertionStart(response: AssertionStartResponse): Promise<void> {
    try {
      const publicKey = PublicKeyCredential.parseRequestOptionsFromJSON(
        response.publicKeyCredentialRequestOptions,
      );
      const credential = (await navigator.credentials.get({
        publicKey,
      })) as PublicKeyCredential | null;

      if (!credential) {
        return;
      }

      await this.finishAssertion(response.assertionId, credential.toJSON());
    } catch (error) {
      if (!this.isExpectedCredentialError(error)) {
        await this.messagesService.showErrorToast('Login failed');
      }
    }
  }
  private async finishAssertion(
    assertionId: string,
    credential: PublicKeyCredentialJSON,
  ): Promise<void> {
    const assertionResponse = {
      assertionId,
      credential,
    };

    const loading = await this.messagesService.showLoading('Validating ...');

    try {
      const ok = await firstValueFrom(
        this.httpClient.post<boolean>('assertion/finish', assertionResponse, {
          withCredentials: true,
        }),
      );
      await loading.dismiss();

      if (ok) {
        await this.router.navigateByUrl('/home', { replaceUrl: true });
      } else {
        await this.messagesService.showErrorToast('Login failed');
      }
    } catch {
      await loading.dismiss();
      await this.messagesService.showErrorToast('Login failed');
    }
  }
The authenticator returns an AuthenticatorAssertionResponse, which contains the signed challenge and authenticator data. The server validates the signature with the stored public key and updates the signature counter in the credentials table.
  @PostMapping("/assertion/finish")
  public boolean finish(@RequestBody AssertionFinishRequest finishRequest,
      HttpServletRequest request, HttpServletResponse response) {

    AssertionStartResponse startResponse = this.assertionCache
        .getIfPresent(finishRequest.getAssertionId());
    this.assertionCache.invalidate(finishRequest.getAssertionId());

    if (startResponse == null) {
      Application.log.error("invalid assertion finish request");
      return false;
    }

    try {
      AssertionResult result = this.relyingParty.finishAssertion(
          FinishAssertionOptions.builder().request(startResponse.getAssertionRequest())
              .response(finishRequest.getCredential()).build());

      if (result.isSuccess()) {
        if (!this.credentialRepository.updateSignatureCount(result)) {
          Application.log.error(
              "Failed to update signature count for user \"{}\", credential \"{}\"",
              result.getUsername(), finishRequest.getCredential().getId());
        }

        var appUserRecordResult = this.dsl.select(APP_USER.asterisk()).from(APP_USER)
            .innerJoin(CREDENTIALS).onKey()
            .where(CREDENTIALS.WEBAUTHN_USER_ID
                .eq(result.getCredential().getUserHandle().getBytes()))
            .fetchOne();

        if (appUserRecordResult != null) {
          var appUserRecord = appUserRecordResult.into(APP_USER);
          AppUserDetail userDetail = new AppUserDetail(appUserRecord,
              new SimpleGrantedAuthority("USER"));
          AppUserAuthentication auth = new AppUserAuthentication(userDetail);
          SecurityContextHolder.getContext().setAuthentication(auth);
          this.securityContextRepository.saveContext(SecurityContextHolder.getContext(),
              request, response);
          return true;
        }
      }
    }
    catch (AssertionFailedException e) {
      Application.log.error("Assertion failed", e);
    }

    return false;
  }
Code example: passkey autofill with conditional mediation 
If your sign-in page also contains a username field, you can ask the browser to surface passkeys directly in the autofill UI. The HTML field needs the webauthn autocomplete token.
<input
  type="text"
  name="username"
  autocomplete="username webauthn"
>
On page load, check whether conditional mediation is available, fetch the assertion options from the server, and then start a navigator.credentials.get() call with mediation: 'conditional'.
async function startPasskeyAutofill(): Promise<void> {
  if (!window.PublicKeyCredential) {
    return;
  }

  const conditionalUiAvailable =
    await PublicKeyCredential.isConditionalMediationAvailable();

  if (!conditionalUiAvailable) {
    return;
  }

  const response = await fetch('/assertion/start', {
    method: 'POST',
    credentials: 'include'
  });

  if (!response.ok) {
    return;
  }

  const body = await response.json();
  const publicKey = PublicKeyCredential.parseRequestOptionsFromJSON(
    body.publicKeyCredentialRequestOptions
  );

  const credential = await navigator.credentials.get({
    publicKey,
    mediation: 'conditional'
  }) as PublicKeyCredential | null;

  if (!credential) {
    return;
  }

  const verificationResponse = await fetch('/assertion/finish', {
    method: 'POST',
    credentials: 'include',
    headers: {
      'Content-Type': 'application/json'
    },
    body: JSON.stringify({
      assertionId: body.assertionId,
      credential: credential.toJSON()
    })
  });

  if (verificationResponse.ok) {
    window.location.href = '/home';
  }
}
The important detail is that you omit allowCredentials on the request. That is what allows the browser and authenticator to discover matching passkeys for the current relying party and show them in autofill.
Spring Security 
After a successful assertion, the application signs the user into Spring Security by creating an AppUserDetail and an AppUserAuthentication, then storing that authentication object in SecurityContextHolder.
        if (appUserRecordResult != null) {
          var appUserRecord = appUserRecordResult.into(APP_USER);
          AppUserDetail userDetail = new AppUserDetail(appUserRecord,
              new SimpleGrantedAuthority("USER"));
          AppUserAuthentication auth = new AppUserAuthentication(userDetail);
          SecurityContextHolder.getContext().setAuthentication(auth);
          this.securityContextRepository.saveContext(SecurityContextHolder.getContext(),
              request, response);
          return true;
        }
To complete the integration, the application disables Spring Security's built-in authentication flow because the Authentication object inserted into the security context is already authenticated.
Providing a minimal AuthenticationManager bean is enough.
  @Bean
  AuthenticationManager authenticationManager() {
    return authentication -> {
      throw new AuthenticationServiceException("Cannot authenticate " + authentication);
    };
  }
The application uses the JSESSIONID session cookie to persist the login. WebAuthn does not change that part of the architecture. After the assertion is verified, you can continue with a normal session-based or token-based application design.
The security configuration also customizes logout to return a status code instead of redirecting, exposes /registration/* and /assertion/* publicly, and returns HTTP 401 for unauthorized access to protected endpoints.
  @Bean
  public SecurityFilterChain filterChain(HttpSecurity http) throws Exception {
    http.csrf(CsrfConfigurer::disable)
        .securityContext(securityContext -> securityContext
            .securityContextRepository(delegatingSecurityContextRepository()))
        .logout(customizer -> {
          customizer.logoutSuccessHandler(new HttpStatusReturningLogoutSuccessHandler());
          customizer.deleteCookies("JSESSIONID");
        }).authorizeHttpRequests(customizer -> {
          customizer.requestMatchers("/registration/*", "/assertion/*").permitAll();
          customizer.anyRequest().authenticated();
        }).exceptionHandling(customizer -> customizer
            .authenticationEntryPoint(new HttpStatusEntryPoint(HttpStatus.UNAUTHORIZED)));
    return http.build();
  }
Recovery 
The demo includes a simple recovery workflow. After a successful registration, the server generates 16 random bytes, stores them in app_user.recovery_token, Base58-encodes the value, and returns it to the client.
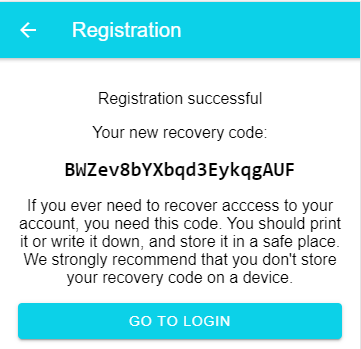
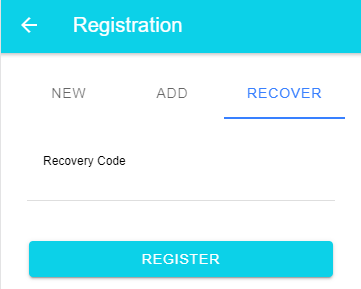
If the user loses access to the authenticator, they can open the recovery view on the registration page and enter that code. The server resolves the token to the existing account, deletes the old credentials, and starts a new registration flow for the same user.
Conclusion 
WebAuthn gives us a clean way to build passwordless sign-in with phishing-resistant public-key cryptography. With Spring Boot on the server and a small amount of browser-side code in Angular, it is very feasible to build a passkey-based login flow without introducing much application-specific complexity.
The source code for the demo application is hosted on GitHub:
https://github.com/ralscha/webauthn-demo/
If you find bugs or have a question, open an issue or send me a message.