With the release of iOS 16.4 (March 2023), all major browser platforms support the Push API. With the Push API, a web application can receive messages pushed from a server, and it doesn't matter if the web app is in the foreground, the background, or even loaded in the browser.
In this blog post, I show you how to implement a web application with Angular that receives push notifications and an application server with Java that sends push messages.
How Web Push works 
An application server can't send a push message directly to a web app. It has to go through a Push Service responsible for delivering the message to the browser. Each browser vendor runs its own Push Service. These Push Services are free to use, and you don't need an account.
Each push subscription receives a unique endpoint URL from the Push Service. A browser can hold many such subscriptions for different applications.
An application server uses this endpoint URL to send a push message to the Push Service by HTTP POST requests.
Web Push does not provide multicast subscription topics like a pub/sub broker. Its HTTP Topic header only replaces an older pending message for the same individual subscription; it does not fan a message out to a group.
The application server has to send a message to each subscription individually. If you
have 100,000 subscribers, your application server has to send 100,000 HTTP requests to the Push Services.
The Push API uses public-key cryptography for two separate purposes: VAPID authenticates the application server to the Push Service, while Web Push encryption keeps the payload confidential between the application server and the browser.
For VAPID, the application server owns a long-lived P-256 ECDSA key pair. The browser supplies the public key when it creates a restricted push subscription. When sending a push request, the application server includes a short-lived JWT signed with the VAPID private key and presents the public key to the Push Service. The Push Service validates this authentication information; it does not forward the VAPID JWT or key to the browser. See RFC 8292 for the complete protocol.
The subscription also contains the browser's P-256 ECDH public key (p256dh) and an authentication secret (auth). For each message, the application server generates an ephemeral P-256 ECDH key pair, combines its private key with the browser's public key, derives the content-encryption key and nonce with HKDF, and encrypts the payload with AES-128-GCM. The browser derives the same values with its subscription private key and the server's ephemeral public key, then decrypts the message before delivering it to the Service Worker. See RFC 8291 for the key derivation and content encoding.
Here is a diagram of the workflow:
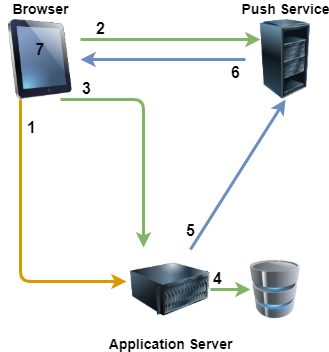
- The browser fetches the application server's public VAPID key.
- The browser creates a restricted subscription with the Push Service and receives an endpoint URL, a
p256dhpublic key, and anauthsecret. - The browser sends the complete subscription to the application server.
- The application server stores the subscription.
- For each message, the application server encrypts the payload for that subscription, signs a VAPID JWT, and sends both in an HTTP request to the endpoint URL.
- The Push Service validates the VAPID credentials and delivers the encrypted message to the browser.
- The browser decrypts the message and passes the plaintext payload to the Service Worker. VAPID validation has already happened at the Push Service.
If you want to learn how to implement encryption and signing from scratch in Java, check out my previous blog post.
Setup Angular 
The demo application for this blog post consists of just one page with a button to subscribe to push messages and some info texts about the current state.
I created the Angular app with the following command:
> ng new webpushdemo --routing=false --minimal=true --skip-git=true --standalone=true --strict=true --style=css
For an app to receive push messages, it has to have an active Service Worker. Angular makes adding a Service Worker to an existing app straightforward. Run the following command:
> ng add @angular/pwa
This command adds a manifest file and several icons to the project. It also updates the dependencies and configuration files of the app so that it automatically loads and installs a Service Worker when the app starts up.
The Push API is one of the web features that are only available in a secure context. Secure context means that the web app must be delivered over TLS. There is an exception for localhost, which also works with HTTP.
You can test push messages in Angular development mode. To do so, you have to update the file
app.config.ts and set the flag enabled to true:
export const appConfig: ApplicationConfig = {
  providers: [
    provideHttpClient(withXhr()),
    provideServiceWorker('ngsw-worker.js', {
      enabled: true,
      registrationStrategy: 'registerWhenStable:30000',
    }),
  ],
};
Setup Java 
The Java back end is a simple Spring Boot application with a REST controller. I created the project with Spring Initializr.
The zerodep-web-push-java library is used for sending push messages. Under the hood, the Push API uses JWT for signing and encryption. zerodep-web-push-java
provides several adapter libraries for JWT. It supports the following libraries:
auth0, fusionauth, jjwt, jose4j, nimbus-jose, and vertx.
This example uses auth0 java-jwt.
    <dependency>
      <groupId>com.zerodeplibs</groupId>
      <artifactId>zerodep-web-push-java</artifactId>
      <version>2.1.5</version>
    </dependency>
    <dependency>
      <groupId>com.zerodeplibs</groupId>
      <artifactId>zerodep-web-push-java-ext-jwt-auth0</artifactId>
      <version>2.1.5</version>
    </dependency>
    <dependency>
      <groupId>com.auth0</groupId>
      <artifactId>java-jwt</artifactId>
      <version>4.6.0</version>
    </dependency>
To create the server key pair, I ran the following commands:
openssl ecparam -genkey -name prime256v1 -noout -out sourceKey.pem
openssl pkcs8 -in sourceKey.pem -topk8 -nocrypt -out vapidPrivateKey.pem
openssl ec -in sourceKey.pem -pubout -conv_form uncompressed -out vapidPublicKey.pem
rm sourceKey.pem
The demo application reads these two keys into memory using the following code.
@Service
public class WebPushService {

  private final VAPIDKeyPair vapidKeyPair;

  public WebPushService() {
    String privateKey = null;
    String publicKey = null;

    try (InputStream privateIs = getClass().getResourceAsStream("/vapidPrivateKey.pem")) {
      privateKey = StreamUtils.copyToString(privateIs, StandardCharsets.UTF_8);
    }
    catch (IOException e) {
      Application.logger.error("can't load vapid private key", e);
    }
    try (InputStream publicIs = getClass().getResourceAsStream("/vapidPublicKey.pem")) {
      publicKey = StreamUtils.copyToString(publicIs, StandardCharsets.UTF_8);
    }
    catch (IOException e) {
      Application.logger.error("can't load vapid public key", e);
    }

    this.vapidKeyPair = VAPIDKeyPairs.of(PrivateKeySources.ofPEMText(privateKey),
        PublicKeySources.ofPEMText(publicKey));
  }

  public String getPublicKey() {
    return this.vapidKeyPair.extractPublicKeyInUncompressedFormAsString();
  }

  public VAPIDKeyPair getKeyPair() {
    return this.vapidKeyPair;
  }

}
iOS quirks 
Before we take a closer look at the code, there are some things to consider when using web push messages on iOS.
The Push API has been supported on iOS since version 16.4.
Unlike the other platforms, a web application on iOS can only subscribe to a Push Service and receive push messages if it's installed on the home screen. Apple calls these apps "Home Screen web apps." The Push API does not work when the user opens the web app in Safari.
Unfortunately, Apple doesn't make it very convenient to install a web app on the home screen, like it is on Android with Chrome. The user has to open the web app in Safari, then open the menu and select "Add to Home Screen." Chrome on Android automatically shows a dialog to install the web app on the home screen when the user visits the web app for the first time.
Like other platforms, web applications must ask the user for permission to receive push messages.
On iOS, requesting permission must be done in response to a user gesture (e.g., a click on a button).
On Android, I could request permission on page load in an ngOnInit method. This is not possible on iOS.
Do not rely on invisible background Web Push work, especially on iOS. The sample therefore includes a notification payload, which the Angular Service Worker displays when the push message is received.
Another difference I noted is that iOS notification dialogs do not support custom actions. You can send push messages with custom actions on Android and Chrome on Windows. The notification dialog on these platforms then shows a button for each action in the dialog. This does not work on iOS. Also, iOS does not show the custom icon specified in the push message. Instead, it shows a default icon.
Check out the Apple developer documentation for more information about web push notifications on iOS.
Implementation details 
The Angular app uses the following HTML template. It shows a subscribe button if the user has not subscribed yet. It shows an unsubscribe button if the user has subscribed. If the user has denied permission to receive push messages, it shows a message, and if the Push API is not implemented, it shows the text Web Push not supported.
@if (webPushSupported) {
  <div class="content">
    @if (!subscribed && !permissionDenied) {
      <button (click)="subscribe()">Subscribe</button>
    }
    @if (permissionDenied) {
      <div>Permission denied</div>
    }
    @if (subscribed && !permissionDenied) {
      <button (click)="unsubscribe()" class="unsubscribe">Unsubscribe</button>
    }
  </div>
}

@if (!webPushSupported) {
  <div class="content">
    <div class="info">Web Push not supported</div>
  </div>
}
In Angular, we can inject the SwPush service, which the application uses for subscribing and unsubscribing.
The SwPush service is part of the Angular Service Worker.
In the ngOnInit method, the application checks if the browser supports web push messages.
The SwPush service provides the isEnabled property for this. If true, the browser supports the Push API.
Unfortunately, the isEnabled property is also true on iOS 16.4+ when the user opens the web app in Safari.
Therefore, the code uses an additional check for iOS.
In modern applications, prefer checking display-mode: standalone first and use window.navigator.standalone only as an iOS-specific fallback.
The code then checks whether the user has subscribed to the Push Service. SwPush.subscription is an observable
that emits the current subscription. If the user has subscribed, the method sets the subscribed property to true
and sends the subscription to the server. The subscription object contains the endpoint URL and the client's public key.
For newer Angular versions, also consider subscribing to SwPush.pushSubscriptionChanges so the client can re-send updated subscriptions when the browser rotates them automatically.
  async ngOnInit() {
    // standalone: boolean indicating whether the browser is running in standalone mode.
    // Available on Apple's iOS Safari only
    const isIOS = 'standalone' in window.navigator;
    const isIOSStandalone =
      'standalone' in window.navigator && window.navigator.standalone === true;
    this.enabled = this.#swPush.isEnabled;
    if (this.#swPush.isEnabled && (!isIOS || isIOSStandalone)) {
      this.webPushSupported = true;

      // fetch the current subscription
      this.#currentSubscription = await firstValueFrom(this.#swPush.subscription);
      if (this.#currentSubscription) {
        this.subscribed = true;
        await lastValueFrom(
          this.#httpClient.post(`${environment.SERVER_URL}/subscribe`, this.#currentSubscription),
        );
      }
    } else {
      this.webPushSupported = false;
    }
  }
The subscribe method is called when the user clicks the Subscribe button. Here, the application first fetches the server's public key with a GET request. Then, it requests a subscription from the Push Service with SwPush.requestSubscription.
This triggers the browser to show a dialog to the user to ask for permission to receive push messages. SwPush.requestSubscription returns a Promise rejected if the user denies permission.
After a user explicitly grants or denies notification permission, the browser normally remembers that decision. A denied permission generally has to be changed in the browser or operating-system settings. Dismissing a prompt without choosing may leave the permission in the default state, so do not assume every prompt produces a permanent decision.
When the user grants permission, the application sends a request to the Push Service and receives the endpoint URL.
The Push API wraps the endpoint URL in a PushSubscription object together with the public key of the client and
returns it to the application. Lastly, the application sends this subscription object to our application server.
The client is now ready to receive push messages.
  async subscribe() {
    if (!this.#currentSubscription) {
      this.#serverPublicKey = await lastValueFrom(
        this.#httpClient.get(`${environment.SERVER_URL}/publicKey`, { responseType: 'text' }),
      );

      try {
        this.#currentSubscription = await this.#swPush.requestSubscription({
          serverPublicKey: this.#serverPublicKey!,
        });
      } catch (e) {
        console.error(e);
        this.permissionDenied = true;
        return;
      }
    }

    if (this.#currentSubscription) {
      await lastValueFrom(
        this.#httpClient.post(`${environment.SERVER_URL}/subscribe`, this.#currentSubscription),
      );
      this.subscribed = true;
    } else {
      this.subscribed = false;
    }
  }
An alternative way to check if the user has granted the web app permission to receive push messages is to use the Permission API:
const permission = await navigator.permissions.query({name: 'notifications'});
    switch (permission.state) {
    case 'granted':
        // user granted permission
        break;
    case 'denied':
        // user denied permission
        break;
    case 'prompt':
        // user did not grant or deny permission yet
        break;
}
Here is the implementation of the /publicKey endpoint in the Spring Boot application.
  @GetMapping(path = "/publicKey")
  public String publicKey() {
    return this.webPushService.getPublicKey();
  }
Note that the Angular Service Worker expects the server public key as a string in base64 format.
The zerodep-web-push-java library has a convenient method that returns the public key in this format.
  public String getPublicKey() {
    return this.vapidKeyPair.extractPublicKeyInUncompressedFormAsString();
  }
The subscriptions are tied to the public key of the server. Therefore, you can't change the application server key pair if there are active subscriptions unless you find a way to force all clients to re-subscribe.
The /subscribe endpoint receives the subscription object from the client with the endpoint URL and the client's public key
and stores it in a map. You would store the subscription in persistent storage for a real application.
The endpoint URL is unique for each subscription and can be used as a primary key.
  @PostMapping("/subscribe")
  @ResponseStatus(HttpStatus.CREATED)
  public void subscribe(@RequestBody PushSubscription subscription) {
    Application.logger.info("subscribe: " + subscription);
    this.pushSubscriptions.put(subscription.getEndpoint(), subscription);
  }
Sending push messages 
The demo application uses the following scheduled method to send push messages to all subscribers via the Push Service every minute. It reads a random joke from the Chuck Norris Joke API, creates a JSON message with the joke, loops over all subscriptions, and sends an HTTP POST request to the endpoint URL.
The zerodep-web-push-java library supports different HTTP client libraries (Apache, OkHttp, Vertx, Jetty),
and the Java 11 HTTP client library, which I use in this example.
  @Scheduled(fixedDelayString = "PT1M")
  public void sendJokes() {
    if (this.pushSubscriptions.isEmpty()) {
      return;
    }

    Joke joke = this.chuckNorrisJokeService.getRandomJoke();

    Application.logger.info("sending joke to subscribers: {}", joke.id());

    String msg = """
        {
          "notification": {
             "title": "{title}",
             "body": "{body}",
             "icon": "assets/icons/icon-72x72.png",
             "data": {
               "onActionClick": {
                 "default": {"operation": "navigateLastFocusedOrOpen", "url": "/"},               }
             }
          }
        }
        """
        .replace("{title}", "Chuck Norris Joke").replace("{body}", joke.value());

    for (PushSubscription subscription : this.pushSubscriptions.values()) {
      HttpRequest request = StandardHttpClientRequestPreparer.getBuilder()
          .pushSubscription(subscription).vapidJWTExpiresAfter(3, TimeUnit.HOURS)
          .vapidJWTSubject("mailto:example@example.com").pushMessage(msg)
          .ttl(1, TimeUnit.HOURS).urgencyNormal().topic("Joke")
          .build(this.webPushService.getKeyPair()).toRequest();

      try {
        HttpResponse<String> httpResponse = this.httpClient.send(request,
            HttpResponse.BodyHandlers.ofString());

        switch (httpResponse.statusCode()) {
        case 201 -> {
          Application.logger.info("Push message successfully sent: {}",
              httpResponse.body());
        }
        case 404, 410 -> {
          Application.logger.warn("Subscription not found or gone: {}",
              subscription.getEndpoint());
          // remove subscription
          this.pushSubscriptions.remove(subscription.getEndpoint());
        }
        case 429 -> {
          Application.logger.error("Too many requests: {}", request);
          // TODO: retry
        }
        case 400 -> {
          Application.logger.error("Invalid request: {}", request);
          // TODO: something is wrong with the request
        }
        case 413 -> {
          Application.logger.error("Payload size too large: {}", request);
          // TODO: decrease payload
        }
        default -> {
          Application.logger.error("Unhandled status code: {} / {}",
              httpResponse.statusCode(), request);
          // TODO: might be a temporary problem with the push service. retry
        }
        }

      }
      catch (IOException | InterruptedException e) {
        Application.logger.error("sending to push notification failed", e);
      }

    }

  }
The payload of the push message is a JSON object with a notification property.
It supports the fields described in the documentation.
Note that not all browsers support all properties. For example, icon was ignored by iOS when I tested it.
Only title is required.
topic is a string that can be used to replace pending messages with a new message if they have matching topic names.
This is useful in scenarios where multiple messages are sent while a device is offline,
and you only want a user to see the latest message when the device is turned on.
The data property is a JSON object that can be used to pass custom actions. The default action
tells the Angular Service Worker what to do when the user clicks or taps on the notification dialog. In this example,
it navigates to the application root page. You can also specify an absolute URL to navigate to a different website.
You can find a description of the different operations on this page. Besides the default action, you can add custom actions. Each action can have a different operation and URL and, on supported platforms, are presented as buttons in the notification dialog. As mentioned before, this is not supported on iOS.
vapidJWTSubject must be either an https URI or a mailto URI. It identifies a contact address that the Push Service can use if there is a problem.
The application must check the response status code of the HTTP request. A Push Service can return the following status codes:
| Status Code | Description |
|---|---|
| 201 | Created. The request to send a push message was received and accepted. |
| 429 | Too many requests. Meaning your application server has reached a rate limit with a push service. The push service should include a Retry-After header to indicate how long before another request can be made. |
| 400 | Invalid request. This generally means one of your headers is invalid or improperly formatted. |
| 404 | Not Found. This indicates that the subscription is expired and can't be used. In this case, you should delete the subscription. |
| 410 | Gone. The subscription is no longer valid and should be removed from the application server. |
| 413 | Payload size too large. According to the Web Push RFC, a Push Service must support messages with a payload size of up to 4 KB. |
Note that returning the code 201 does not mean that the push message was delivered to the client; it was only accepted by the Push Service. The Push Service will try to deliver the message to the client, but it might fail if the client is offline or the device is turned off. When the TTL of the message expires during this time, the message will be discarded and not delivered to the client.
Unsubscribe 
To unsubscribe a client from push notifications, it may call the unsubscribe method on the PushSubscription object.
In this example, it also sends a request to the application server, which is not strictly necessary because
when the application server tries to send a push message for this client, it receives back a 404 or 410 status code from the Push Service
and then removes the subscription from the database.
  async unsubscribe() {
    if (this.#currentSubscription) {
      await this.#currentSubscription.unsubscribe();
      await lastValueFrom(
        this.#httpClient.post(`${environment.SERVER_URL}/unsubscribe`, this.#currentSubscription),
      );
      this.#currentSubscription = null;
      this.subscribed = false;
    }
  }
The application server removes the subscription from the map of subscriptions.
  @PostMapping("/unsubscribe")
  @ResponseStatus(HttpStatus.NO_CONTENT)
  public void unsubscribe(@RequestBody PushSubscription subscription) {
    Application.logger.info("unsubscribe: " + subscription);
    this.pushSubscriptions.remove(subscription.getEndpoint());
  }
This concludes the blog post about receiving and sending web push notifications with Angular and Java. I hope you found it helpful. For more information, check out the following links: