Capacitor is Ionic's native runtime for packaging applications written in JavaScript, CSS, and HTML for iOS, Android, and the web. It works similarly to Cordova, but today the Capacitor ecosystem is the better default choice for Ionic applications because the native projects are part of your app and the official plugins are actively maintained.
There are a few differences from Cordova. One important difference is that Cordova recreates the Android and iOS build folders when it generates a new app version, whereas with Capacitor, you create the native projects once and usually commit them to source control. During development, you then sync the build output of your web application into the native projects with npx cap sync.
Another difference is that Capacitor ships with first-party plugins for many common tasks.
You can find the current plugin list here:
https://capacitorjs.com/docs/apis
Capacitor not only supports its own plugins, it also supports many Cordova plugins, so you still have access to a wide variety of packages if you need them. For new work, prefer an official Capacitor plugin when one exists.
Read more about Capacitor on the official homepage:
https://capacitorjs.com/
In this blog post, we are going to create a simple app where the user can take a photo and the application automatically uploads it over HTTP to a Spring Boot backend. The app implements the upload in two different ways. One uses Angular's HttpClient for a regular multipart upload, and the other uses the JavaScript tus library, which splits the file into multiple chunks and uploads them one by one.
I cover the tus functionality only briefly in this blog post because I wrote a blog post about tus that covers this topic in detail: https://blog.rasc.ch/2019/06/upload-with-tus.html
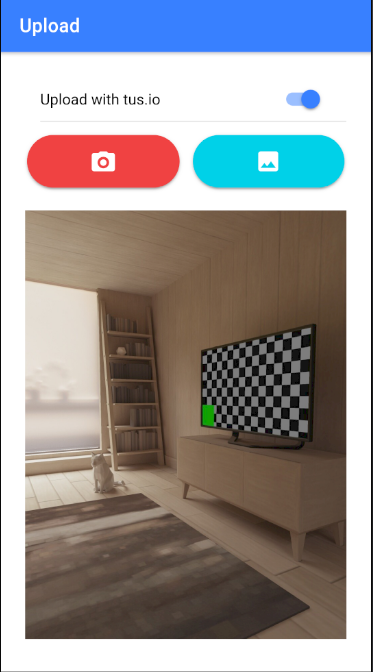
Here is a screenshot of the app. With the toggle, you can switch between the regular upload and the tus.io upload.
Client 
Setup 
The client application is an Ionic Angular app. First, add the JavaScript tus library.
npm install tus-js-client
and the Capacitor libraries and CLI
npm install @capacitor/core
npm install @capacitor/camera
npm install -D @capacitor/cli
npx cap sync
Initialize Capacitor
npx cap init
In current Capacitor versions, we import the Camera plugin directly from @capacitor/camera.
import { Camera, CameraResultType, CameraSource } from '@capacitor/camera';
We can then call the Camera API directly through Camera.getPhoto().
Camera API 
The app presents two buttons, one to take a photo with the camera and one to select a picture from the photo gallery.
The code behind these buttons is almost identical. The only difference is the source property that we pass in
the configuration object for Camera.getPhoto().
  async takePhoto(): Promise<void> {
    await this.handlePhotoSelection(CameraSource.Camera);
  }

  async selectPhoto(): Promise<void> {
    await this.handlePhotoSelection(CameraSource.Photos);
  }

  private async handlePhotoSelection(source: CameraSource): Promise<void> {
    this.error.set(null);

    const webPath = await this.getPhoto(source);
    if (!webPath) {
      return;
    }

    if (this.tus()) {
      await this.uploadTus(webPath);
    } else {
      await this.uploadAll(webPath);
    }
  }

  private async getPhoto(source: CameraSource): Promise<string | undefined> {
    const image = await Camera.getPhoto({
      quality: 90,
      allowEditing: false,
      resultType: CameraResultType.Uri,
      source,
    });

    if (image.webPath) {
      this.photo.set(this.sanitizer.bypassSecurityTrustResourceUrl(image.webPath));
    }
    return image.webPath;
  }
The Camera.getPhoto() method in this example returns a JPEG image, and with the quality configuration, we indicate the quality of the picture (0 = worst, 100 = best). Greater numbers mean bigger file sizes.
Commonly used returnType values are CameraResultType.Base64, CameraResultType.DataUrl, and CameraResultType.Uri.
The result type Uri returns a path that can be used to set the src attribute of an image for efficient loading and rendering.
We run the path through Angular's DomSanitizer before assigning it to the photo variable.
This variable is then used as the value for the src attribute in an img tag.
    <ion-row>
      <ion-col size="12">
        @if (photo(); as photoUrl) {
          <img [src]="photoUrl" />
        }
      </ion-col>
    </ion-row>
See the documentation for more information about the Camera API, including current platform-specific permission notes and web behavior:
https://capacitorjs.com/docs/apis/camera
Normal upload 
The uploadAll() method implements a simple upload with Angular's HttpClient.
First, we need to convert the web path returned by the Camera plugin into a
Blob. A straightforward solution is to use the Fetch API and "fetch" the
web path, which returns the desired blob object.
Next, we create a FormData object and append a new value with the blob object.
The important thing here is that the name file needs to match the
name of the request parameter on the server we are going to implement in the next section.
  private async uploadAll(webPath: string): Promise<void> {
    this.loading = await this.loadingCtrl.create({
      message: 'Uploading...',
    });
    await this.loading.present();

    const blob = await fetch(webPath).then((r) => r.blob());

    const formData = new FormData();
    formData.append('file', blob, `file-${this.counter++}.jpg`);
Lastly, we send the file with a regular POST request to the Spring Boot backend.
    this.http
      .post<boolean>(`${environment.serverUrl}/uploadAll`, formData)
      .pipe(
        catchError((e) => this.handleError(e)),
        finalize(() => this.loading?.dismiss()),
      )
      .subscribe({
        next: (ok) => this.showToast(ok),
        error: () => this.showToast(false),
      });
  }
tus.io upload 
The upload with the JavaScript tus library works very similarly.
We again convert the web path into a blob object
and then pass this blob to Upload. I won't go much further
into detail about tus.io here because the code is essentially the same
as the code in my blog post about tus.io.
  private async uploadTus(webPath: string): Promise<void> {
    this.loading = await this.loadingCtrl.create({
      message: 'Uploading...',
    });
    await this.loading.present();

    const blob = await fetch(webPath).then((r) => r.blob());
    const upload = new Upload(blob, {
      endpoint: `${environment.serverUrl}/upload`,
      retryDelays: [0, 3000, 6000, 12000, 24000],
      chunkSize: 512 * 1024,
      metadata: {
        filename: `file-${this.counter++}.jpg`,
      },
      onError: () => {
        this.showToast(false);
        this.loading?.dismiss();
      },
      onSuccess: () => {
        this.showToast(true);
        this.loading?.dismiss();
      },
    });

    upload.start();
  }
Build 
With the application finished, we can build the project and add iOS and Android support.
First, make sure that all required dependencies are installed on your computer:
https://capacitorjs.com/docs/getting-started/environment-setup
ng build --configuration production
npx cap add android
npx cap add ios
npx cap sync
Next, open Android Studio and/or Xcode.
npx cap run android
npx cap run ios
From there you can build the native apps and deploy them to a real device or run them inside an emulator.
Server 
The server is a Spring Boot application using the MVC web starter (spring-boot-starter-webmvc)
and is essentially a copy of the application that I wrote for my previous blog post about tus.io.
I add one additional HTTP endpoint that handles the regular upload request.
The important part here is that the request parameter name matches the name in the FormData of the
client (file). The example also normalizes the incoming file name before writing it to disk.
  @CrossOrigin
  @PostMapping("/uploadAll")
  @ResponseBody
  public boolean uploadAll(@RequestParam("file") MultipartFile file) {

    try {
      String fileName = sanitizeFileName(file.getOriginalFilename());
      Path downloadedFile = this.uploadDirectory.resolve(fileName);
      Files.deleteIfExists(downloadedFile);
      try (InputStream inputStream = file.getInputStream()) {
        Files.copy(inputStream, downloadedFile);
      }
      return true;
    }
    catch (IOException e) {
      logger.error("uploadAll", e);
      return false;
    }

  }
The handling of the file is very straightforward. The code reads the bytes from the uploaded MultipartFile and writes them to a file in the upload directory.
This also supports sending multiple files in one request. In the client, you add multiple blobs to the FormData object, each with a different name.
const formData = new FormData();
formData.append('file1', blob1, `file-1.jpg`);
formData.append('file2', blob2, `file-2.jpg`);
and on the HTTP endpoint, you define multiple parameters matching the FormData values.
public boolean uploadAll(@RequestParam("file1") MultipartFile file1, @RequestParam("file2") MultipartFile file2) {
And finally, as always, when you write a Spring Boot application that supports file uploads, check and adjust the max-size settings.
spring.servlet.multipart.max-file-size=20MB
spring.servlet.multipart.max-request-size=20MB

app.tus-upload-directory=./uploads/tus
For testing, I use ngrok. I start the Spring Boot application on my development machine, then create a tunnel with ngrok.
ngrok http 8080
Then I copy the public URL that ngrok gives me into the client application's production environment file.
export const environment = {
  production: true,
  serverUrl: 'https://your-public-url.example',
};
Then build the web application, run npx cap sync, and build the native app in Xcode and/or Android Studio,
and deploy it to a real device or emulator.
Web 
The nice thing about the Capacitor Camera plugin is that it also works on the web with only minimal changes to the existing code.
First, we add one additional package
npm install @ionic/pwa-elements
Then we open src/main.ts and add code that calls defineCustomElements
after the Angular app has been bootstrapped.
bootstrapApplication(AppComponent, {
  providers: [
    provideIonicAngular(),
    provideRouter(routes, withHashLocation()),
    { provide: RouteReuseStrategy, useClass: IonicRouteStrategy },
    provideHttpClient(withXhr(), withInterceptorsFromDi()),
  ],
})
  .catch((err) => console.error(err))
  .then(() => defineCustomElements(window));
The @ionic/pwa-elements package implements web-based functionality and user interfaces for some Capacitor plugins.
For more information about building a photo app with Ionic Angular and Capacitor, see the current tutorial here:
https://ionicframework.com/docs/angular/your-first-app/taking-photos
You find the source code for the example presented in this blog post on GitHub:
https://github.com/ralscha/blog2019/tree/master/capupload